Plans and Dreams

Garden Series 1/4

Today we offically start my garden series where I hope to cover any questions regarding the plans we have for our garden area (which includes the chicken coop)!

I plan to cover majority of topics (size, layout, logistics, design details, maintenance) throughout my next 4 posts:

  • Plans and Dreams

So make sure to check back in if you are having questions regarding our garden space, and if you have any other questions/topics you would like me to cover, please send me a message over on my Instagram: @theroostingplace.

The Space

Our assumption is that this approximately 64’X72′ area was most likely once used as a goat pen because there was evidence of fencing (and remaining fencing) surrounding this space. Here you can see we had already begun to stake out the area for our chicken coop when I took these.

While we are redoing the fenceline, I am extremely grateful to the old fence, as its borders inspired the perfect garden area.

We removed the old fence (we salvaged as much of the wood as we could because I have an idea for it on a later project), for several reasons: it was falling apart and leaning, there were only two complete sides and the fenceline curved severely making attaching a new fence complicated, and this is not the style of fencing I have in mind long term. So goodbye old fence, and soon I will tell you all about my new fence that will be going up.

Additionally, the whole area slopes slightly towards the pond, and other than building areas, we are leaving the slope to prevent flooding. So some areas are a little “wonky” but nothing that is a major problem.

Swipe the bar to remove the old fence!

The Dream

We’ve got big dreams for this “area”! The end goal is to fill this space with the following features:

  • Chicken Coop– check (total building area is approx 180 sqft)
  • 6 raised garden beds-2/6 check
  • Greenhouse (160 sqft)
  • Sitting Area
  • Water Feature of some form
  • String Lights
  • Flower beds, lots of flower beds

Below you can see a rough layout for all the garden features. I’m sure this will be tweaked, but I am a huge proponent of having a physical, drawn out plan in place to reference throuout the process.

The Inspiration

European cottage, but make it Texas. That’s what my ultimate goal is, however, as much as I am drawn to nuetral white and purples in photos, in person I can’t help but grab colorful blooms, so who really knows how this will turn out. Feel free to swoon as hard as I did over these beautiful inspiration pics.

Realistically, I pull pieces from each of these photos and spaces, because each is different. But they all scream “peace” to me. The creeping vines, the mixed tones and materials, the fine line between order and chaos…OOOO I love it all! Ultimately, no matter how my garden ends up, I want it to be a place of peace and serenity. Clearly, a Texas garden will grow what it grows, but I want this space to be a place of rest and growth, and a place for learning, no matter how it looks. I truly believe that the act of tending to the earth brings our spirits closer with God’s creation, and I cannot wait to watch this space flourish.

Talk soon,

xx, Lanna


About Our Flock

I get tons of questions over the temperment and qualities of the chickens we have in our coop, so I think it is high time that these special ladies get to shine in the spotlight. But before I tell you about them, I need to let you in on a lesser-known term for first time chicken buyers: chicken math. That’s right, math for chickens. This is a phrase that we as first time chicken parents had no clue about, and have had the “pleasure” of learning about through experience.

So, what is “chicken math”?

Chicken math is the term used to describe being sent more chicks than you order, in the case that some do not survive.

With that preface, I want to share our chicken ordering experience, and I bet you can guess what happens. We built our chicken coop with an enclosed run to protect our babies from all the hawks that we have nesting in our trees. Humanely, chickens need approx 8-10 sq ft per chicken in the run area to avoid any agression or health issues. With this knowledge in our back pocket, we decided that we wanted to have 10-12ish chickens total (maybe more if I get brave enough to let them range outside the run as they get older).

We decided to order our chickens from Cackle Hatchery, a hatchery that will ship your selected chick breed/sexes to you as soon as they hatch (one day old chicks). We decided to purchase 15 chicks, 3 of 5 different breeds, and did this because we expected some to not survive the mail/adolesance for whatever issue that can arise in baby chicks. WELL. Apparently the breeder already takes these risks into account, and sent us 5 EXTRA in case any were lost due to the mailing process or sickness.

So now, we have 20, healthy, thriving, RAVENOUS, chickens. Supposedly they are all female, but we are waiting to see if any crow before we start to rehome some of them. There’s just no way we can keep them all. First to go will be any roos, because we live in the city limits and have a couple of neighbors that would probably report them…lame…I know. But that’s okay. We aren’t ready to tackle the whole fertilized egg process just yet. Maybe one day!

With all that being said, I chose my breeds of chickens based on these primary factors: temperment, and egg color, and production output, all paired with how the bird itself would look.

Meet Our Flock Breeds:

We have 5 different breeds- Cuckoo Maran, Buff Orpington, Black Laced Golden Wyandotte, Brown Leghorn, and Easter Egger. Check out the quick facts about each breed below.

Cuckoo Maran

Size: Hens- 7 pounds; Roos- 8 pounds

Temperment: Friendly, Docile, Easily Handled

Egg color: Dark Chocolate Brown

Egg Production: 150/year

These are actually my easiest to catch and best handled chickens. Every single one of them is well-held, and may be my favorite breed in the coop for that reason.

Buff Orpington

Size: Hens- 8 pounds; Roos: 10 pounds

Temperment: Calm, Friendly, Bears Confinement well, Easily Handled, Docile, Quite

Egg color: Light Brown

Egg Production: 200-280/year

These birds are huge, which makes sense that they are great dual purpse birds. They’re extremely calm, howeve, I can’t catch one. These big girls have some speed!

Black Laced Golden Wyandotte

Size: Hens- 7 pounds; Roos: 9 pounds

Temperment: Bears Confinement Well, Calm, Docile, Easily Handled, Friendly, Quiet

Egg color: Brown and Speckled

Egg Production: 200/year

SUCH pretty birds. I love how the black in thier feathers refelcts blue/green in the sun. They have been some of my more difficult birds to catch, but when I do they are well handled and calm.

Brown Leghorn

Size: Hens-6 pounds; Roos: 7 pounds

Temperment: Friendly, Bears Confinement well, Calm, Flighty, Noisy, Shy, Very Active

Egg Color: White

Egg Production: 300-320/year

While I haven’t noticed a major noise issue, these birds are extremely curious, but very flighty. They run at most sudden movements.

Easter Egger

Size: Hens- 4 pounds; Roos-5 pounds

Temperment: Calm, Hardy, Friendly, Docile, Easily Handled, Bears Confinement Well

Egg Color: Blue/Green

Egg Production: 200-280/year

Fun fact: these chickens are named purely for their egg color, and no two birds are guaranteed to look alike! We have 2 fawn colored ones, a white one, and this beautiful grey one!

So as you can see, if we kept all 20 chickens, we would have SO MANY eggs on our hands (I’m talking average 5,000 eggs a year). All of these birds are either medium or high producers, and there is just too many of them.

Rumor is, we can 100% accurately sex anywhere between 4-6 months,we are just waiting for the crows! As a plus, any day now these ladies should start paying their rent! I hope to be able to name them once we rehome and get to our final number, and I will officially introduce the whole flock when that time comes!

Talk soon,

XX, Lanna


Chicken Coop Update:

It’s been a couple of months since we finished the Chicken Coop and shared the final product with the world! And I can honestly say these chickens have already taught me so much. I want to shed some light on the things that we have learned, and changed in our chicken coop so far:

You can always find more updates on my Instagram: @theroostingplace

First off, the plants on the ground did not survive 20 chickens. HAHA. These ladies demolished them within a couple of days, down to the sticks: the poor plants never stood a chance.

But, I was determined to find a solution that would allow me to keep my run beautifully green and that would keep beneficial herbs available to my chickens. Thus, the gallery wall was born. This includes a collage of chicken wall decor, and some hanging planters to put all those yummy herbs-all while keeping them away from hungry, spoiled chickens! I also have found success in planting tree-like shrubs in pots, and plan to add more over time because I love the way it looks.

Secondly, our Omelt automatic door finally made it to us! And let me tell you, as someone who loathes waking up early in the morning, I love it and the shipping wait was totally worth it. It was extremely easy to assemble/set up, and the different setting options make it customizable to your needs. We have ours set to the clock, with timers that will open and shut the doors at specified times (we watched our chickens to determine what time they naturally would go inside the coop for bed and set the time based on thier habits). This door even comes with a safety feature that will stop the door from moving if it detects an obstacle in the way-that right, no injured chickens over here!

Lastly, I started to experiment with methods to reduce the whole chicken poo smell. I’ve tried both diatomeceous earth, and PDZ horse stall refresher, and decided that I really like the PDZ. I’ve been sprinkling it on my pine shavings inside the coop, and over teh wood chips in the run and have found that I can stretch my cleaning out by a week or two, which can be a huge lifesaver!

That’s all on the coop update for now, but I will check back in as we learn and adapt to these crazy chickens!

Talk soon,

xx, Lanna


Hallway Board and Batten Wall

The board and batten hallway wall is DONE! In all honesty, I started this project over a month ago, and this is one one the quickest projects to complete…if you order enough wallpaper to begin with…YEP. I only ordered one roll (I needed three) of this beautiful wallpaper from Wallery, and I realized the moment I was going to put it up. Huge fail on my part, but hey, live and learn. While I have officially dubbed this small, dark hall as my “home’s most challenging place to photograph”, this area turned out to be exactly how I envsioned it, and I am super excited to have a beautiful, yet functional, spot to “dump” all those jackets and bags that always pile up in random places!

Links +Deets:

Board and Batten Basics:

I’m sure you noticed, but I have textured walls. Because the price of lumber is outrageous accross the board and we just built our chicken condo, I opted to let the texture slide and didn’t glue board behid my battens. If you want a smooth finish, use liquid nails to put up a back board (like a wall panel or thinner piece of smooth plywood, idk I didn’t do this don’t quote me) then place your battens on top.

I used 1″X2″ MDF boards for my vertical boards, and 1″X4″ MDF for my horizontal top boards. These are attached with nails (use a level to ensure they are straight), then fill any holes with wood filler and caulk the gaps to give a seamless appearance. Before applying your favorite paint, be sure to prime your boards. This ensures that the paint sticks properly and doesn’t soak in. That’s pretty much all there is to it to board and batten walls-its a super easy and fast project that quickly transforms a space.

Paint: Herb Bouquet by Benjamin Moore

I love how the green board and batten combined with aged gold hooks ties my small living/kitchen area into the hallway! I used Herb Bouquet by Benjamin Moore (but in Sherwin Williams Duration paint, we like the quality better). Every time I use this paint, I am transported into a cozy, earthy wonderland, and I am convinced this may be the perfect shade of green/gray for home accents.

Wallpaper: Shadow in Gray by Wallery

This wallpaper is the perfect additon to this space. I love how sublte the design is, and how it adds a delicate drama the space without crowding this small hallway. I will note that the white background does make the seams between pieces a tad more noticable than darker wallpapers I have used in the past.

Hooks: Gold Metal Double Wall Hook

I searched the internet high and low for the perfect gold hook, and these were perfect for the price. I may even buy some more to add to this wall..TBD.

Accents/Decor

Talk soon,

xx, Lanna


Building Update: June 15, 2021

Even though I am a bit behind in disecting this on here, I want to always remain open and honest about our whole building process, and be able to shine a light on the “secrets” of building a custom home. If you would like to know more about the specs of our build, click here. If there isn’t a link yet, I’ll have it up soon! So here we go:

About two months ago, we were extremely excited to announce on our Instagram that we had submitted our building plans for permitting. This had been the second time we have submitted so we felt confident that we would be breaking ground very soon. .Unfortunately, this was not the case.

In case I haven’t mentioned it here before, we are within the city limits of Arlington, TX. We have learned that building codes are extremely strict, and I hate to say that we have hit red tape over and over again when dealing with the city. Problem one has been lack of communication from the city planners. I have a feeling that COVID has played a huge part in this problem, as I believe pre-pandemic you would schedule a in-person meeting with a city planner and disect your project requirements in person. Even though we have been in “contact” with the city since early November, we are constantly redirected to the website when asking direct and specific questions. . However, our inability to meet with anyone caused problems when we first submitted our plans in January, since the website was not specific about the submittal requirements for our specific lot.

It then took us 3 more months to gather all the required documents the city asked us to include in the permit application which I have listed below for those who are curious. While we had included a majority of the required documents, the missing ones had to be completed by several different parties, forcing us into a “hurry up and wait” game that continues to this day.

  • Site Plan
  • Floor Plan
  • Exterior Elevations
  • Door and Window Schedule
  • Wall/Wind Bracing Method
  • Energy Compliance
  • Engineered Fondation
  • Water Utilities Application
  • Park and Roadway Impact Fee
  • SWPPP

Fast forward to April 28th, and we were finally back in Permit Review. This time I thought we had checked all the boxes and crossed all our T’s. Our walls were engineered to withstand wind, our foundation and basement had been engineered perfectly, and we had all the other paperwork filled out. We combined all the files into one PDF file as requested, and submitted them into the online portal. We waited. For 5 days we checked back in routinely to watch the status of each requirement change from “pending” to “complete”. Until one day, everything stopped updating and we got an email from the lady who was coordinating our plan reviews.

She informed us our plans needed corrections. Seven pages of corrections…yes, you read that right…7 pages.

Some we saw coming, however originally we were told that we could apply for those portions later. Now they were telling us we needed everything upfront before they wou;d approve the project at all. So what was in these correction requirements?

  • Full extent of driveway shown and material indicated from public street
  • Missing an engineer stamp on our framing plans
  • Missing engineer letter for foundation plans (this was included…)
  • Energy Compliance review missed one back window specs
  • Manufacture information wanted on the polymer waterproofing for the basement
  • Need egress from the basement
  • Private fire hydrant plans needed and required to meet codes that include fire lane specifications OR sprinkler system plans
    • This actually was 3/7 pages outlining fire hydrant requirements and codes…I’m not going into all that…
  • Floorplan lay in a hypotheical easment that isn’t even approved offiically yet
  • Missing Grading Plan with drainage flow plan
  • Elevation certificate prior to inspection
  • Fire Marshall needs to approve fire hydrant plans
  • 3 way contract provided for said fire hydrant required at permit application date.

Okie. So, that is the gist of our 7 page correction report that the lovely city of Arlington threw in our laps. Many of these issues could have been avoided had we been informed correctly of the actual application document requirements, so honeslty reading through the comments was extremely frustrating. As far as that fire hyrdant issue….so the story is that since the house will lay more than 150′ from the main road, we are required to install a private fire hydrant OR install sprinklers in the house. We originally were going to intall a fire hydrant, but then realized that the city is going to require 4″ ,12-foot-wide concrete as a fire lane all the way back to the house. Thats easily 400′ to the other side of the pond, and that amount of concrete definetly is not in the budget.

So, where are we now? We have opted to install a concealed sprinkler system instead of a hydrant since we are under the impression that this option does not require the “fire lane” of a driveway. We have made all the changes and are only waiting for a civil engineer to get us our plans back with drainage and required elevations. Again, it is a hurry up and wait game. We are hoping to be able to resubmit soon and break ground before the summer is over.

I do want to point out that while the past couple of months have been annoying, there have been some disguised blessings through all this, one of the biggest ones being that we are thankful to not have started digging our basement with all the rain that Texas has had recently. I don’t even want to think about how long all the water would have taken to dry out.

That’s all for now, but I hope to have another update soon.

Talk soon,

xx, Lanna


Great Wolf Lodge, Grapevine TX

*I am not affiliated with or endorsed by Great Wolf Lodge*

Great Wolf Lodge is a indoor water park and hotel known for its woodland lodge themes and family-friendly activites for all ages! Little known to me, GWL has multiple locations around the United States including: MA, PA, IL, KS, OH, MN, MI, WI, NC, GA, TX, VA, AZ, CO, WA, CA and one location in Ontario, Canada!

We have visted Great Wolf Lodge, Grapevine as a “staycation” spot several times over the years, all with varying ages of kiddos, and always have had a blast! Most recently, we visited and stayed 24 hours for my younger sister’s 13th birthday. So this post will be a bit of a double whammy covering how we curated a special birthday treat for her, as well as covering activities and other features of the hotel. *Note: I learned that all locations vary a little in activites and style, so check in on your local GWL website for full details about each lodge.*

Arrival

Located in Grapevine, Texas, right across from the Gaylord Texan, you will be transported into a woodland wonderland designed to keep families entertained and immersed in a total vacation mode during your stay. Upon driving in, you are met by large wolve sculptures guarding the entrance to your enchanted getaway. Park your car in the unlaoding zone under the awning and let your pack loose as you are greeted by friendly staff and an easy check in system (be sure to use the Great Wolf App and take advantage of mobile check in (available 24 hours before your arrival)) which guide you to the counter where you are given waterpark bands and an invite to pick up your complimentary wolf ears. Unload your luggage and head up to your room to settle in or head straight to the water park to get your feet wet!

When you stay at the hotel, water park fees are included and you can access the park from 1:00pm on the day of your arrival (even before check-in) to 9:00pm on the date of your departure.

Our Stay

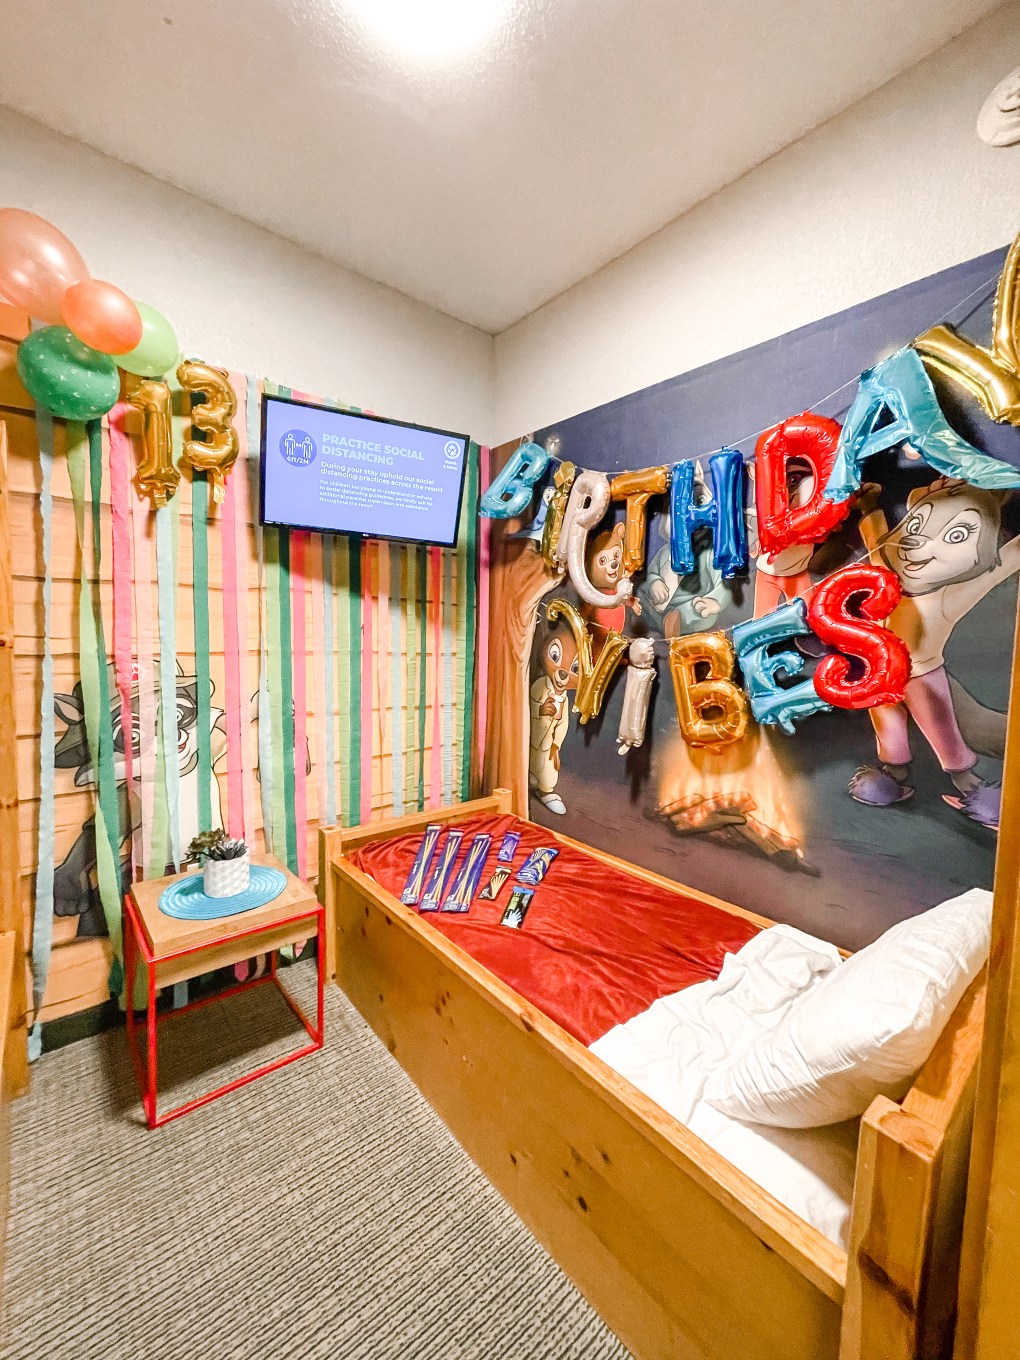
We stayed in the Kid Cabin, which sleeps 6 with a queen mattress, sleeper sofa and features a “kid cabin” equipped with a bunk bed, a twin bed, and woodland characters that will allow your kids to feel like they are camping under the stars!

Here’s where we changed it up a bit to give our birthday girl a special surprise-decorations! I was able to get early check-in by using the app, and our room was ready by the time I arrived at 2pm. Then, using command strips and tape so we didn’t tear up any walls, we hung streamers and balloons to give the room a flirty, fun twist! And yes, my mom made that amazing backdrop prior to arrival so it was quick and easy to put up day of!**Always use temporary/removable items when decorating anywhere that is not your home! Chalk and dry erase markers are a super easy way to personalize a surface without making any permant damage.**

Activities

There are so many ways to enjoy a stay at Great Wolf Lodge!

Indoor Water Park

Half Day Pass $40; Full Day Pass $50; Children 2 and under free

Open from 9:00am-9:00pm, the waterpark is kept 80 degrees year round and includes: “big kid” playscape and slides, “toddler” playscape and slides, tubed waterslides, wave pool, and a lazy river

Outdoor Water Park

Includes an activity pool and more slides, reopening Memorial Day weekend 2021.

Howler’s Peak Ropes Course

Rope Course Single Climb $14.99 + tax

Rope Course All Day Climb: $19.99 + tax

Outdoor ropes course that is several stories tall. Explore via a safety harness.

MagicQuest

Game “open” 9:00am-11:00pm

Wand: $15.99 – $22.99 + tax*
Game: $14.99 + tax

“Explore the lodge and take part in the adventure of a lifetime! MagiQuest turns Great Wolf Lodge into a live-action game where you’re the star. You’ll choose a special magic wand, top it with extra powers, and set off on a quest. Play for a few minutes or all day. Be sure to take your wand home and continue your adventure on your next trip to Great Wolf Lodge.”

Multiple quests are available, honestly this is really fun at any age. There are interactive items throughout the lodge that are “unlocked” by waving the wand in front of the sensor. Very immersive, and highly reccomend if you are staying for a couple of days to give the kids something to do when you need a water break or after the park closes!

There is also ShadowQuest, and CompassQuest to complete for more experienced visitors.

Best for: children, teens, adults

Oliver’s Mining Co.

“Feel the rush in uncovering what’s hiding in your paydirt. Pan and sift your way to finding the beautiful gemstones and minerals waiting to be discovered. Take them home in keepsake collection bag, complete with a gemstone identification card and personalized labels.”

Best for: Children and Teens

Northern Lights Arcade

Located on the bottom floor outside the waterpark entrance, this arcade gives another option for a dry activity.

Build-A-Bear Workshop

Build-a-Wolf in Great Wolf’s very own custom stuffed animal workshop

Best for: Children and Toddlers

Scheduled Events

Entertain the kids with scheduled events like: character meet and greets, story time, cub club, the Great Clock Tower Show (put on by animatronics), yoga tails, dance parties, and art and crafts!

The Lodge also offers a summer camp.

Spa and Fitness Center

Don’t worry mom, there’s a special place for you too! Leave the kids with dad and get some time away to relax. (unfortunately it is currently closed due to COVID, but hopefully will reopen soon.)

Dining

There are several dining/sweet options at the Lodge available during your stay, including the Loose Moose Cottage (cafeteria style serving breakfast and dinner) Bucket’s (in waterpark food stand), Lodge Wood Fired Grille (upscale dining), Hungry as a Wolf (quick service pizza), Grizzly Jack’s Bar and Grill (poolside cocktail and bites), The Watering Hole (waterpark bar) Bear Paw Sweets (bakery and ice cream), Starbucks, and the candy shop inside the gift shop!

There are also tons of restaurants and dining around the Lodge if you are comfortble with driving 10-15 minutes. My sister is Gluten Sensative, so we opted to pick up pizza outside the hotel at Palio’s Cafe, and brought our own food in for breakfast and lunch at the Lodge. There is no outside food or drinks allowed inside the water park itself, but there are tables and chairs around the hotel where you can stop to munch (if you don’t wan’t to go back up to your room.)

In Conclusion

We always have a great time at Great Wolf Lodge, and over the years our family has created a lot of memories here. It was so much fun to celebrate 13 years of life for my younger sister who has the sweetest heart and the most gentle soul, she’s the perfect finalizing piece of our family. She brought 2 other friends and they had an absolulte blast going down water slides, trying to stay above the waves in the wavepool, and blasting through credits in the arcade. All while my mom and I enjoyed dodging water fountains and spinning around in our tubes floating the wavepool. In short, there is something for everyone here, and I highly encourage using Great Wolf Lodge as your next “staycation getaway”.

Talk soon,

xx, Lanna


Chicken Friendly Herbs

And their benefits!

Did you know that there are several plants and herbs that are totally safe and beneficial to your chicken’s health? By adding the following herbs in/around your chicken coop, or by including them in your chicken’s diet, you can reduce the probability of several health risks. I have placed several of these inside my coop, and plant to add more over time!

Sage:

Sage in high in Vitamin K, which aides in blood clotting. Sage also serves as a cleaning agent, pesticide, and antioxidant, which can help in the prevention of salmonella.

Oregano:

Oregano has several antibiotic factors, and is packed with several nutrients such as Vitamin K, manganese, iron, Vitamin E, tryptophan and calcium. Becasue of this, oregano helps fight e.coli, salmonella, coccidiosis, and avian flu! This herb is being studied as a broad-spectrum natural antibiotic on large poultry farms! You go oregano!

Lavender:

Lavendar is high in Vitamin A (useful for eye health), calcium (bone strength), and iron. Not only does it smell lovely and can act as an air freshener, it is known to be a natural insect repellant, and contains antioxidant and anti-inflammatory properties, which can reduce stress.

Rosemary:

Benefits: Rosemary is high in manganese (useful in metobolic health). Not only does rosemary smell great, it is known to be a natural insecticide, has antioxidant properties, assists with pain/stress relief and can enhance respiratory health. Studies have shown that the carnosic and rosmarinic acids in rosemary have powerful antibacterial, antiviral, and antifungal properties.

Mint:

Mint contains trace elements of Vitamin A, iron, potassium, magnesium, calcium, and phosphorus. Mint is a great insecticide and also can keep mice away. Any of the mint varieties (including catmint, peppermint, and spearmint) can be fed to chickens, and also can have a calming effect.

Lemon Balm:

Lemon balm is high in flavonoids, which can have an antioxidant effect. Due to several chemical properties that attribute to scent, (one being citronellal) lemon balm is a natural mosquito repellant,can keep rodents away, and may relieve stress in flocks.

Thyme:

Thyme contains thymol and small amounts of other nutrients such as potassium, vitamin A, vitamin C, and magnesium.  Thyme is a natural insect repellant, has antibiotic properties, and also aides in respiratory health.

Basil:

Basil provides macronutrients, such as calcium and vitamin K, as well as a range of antioxidants, which aide in overall immune health.

Comfrey:

Comfrey is rich in vitamins A and B12 and can aid in a rich yellow color to yolks. Comfrey is high in protein and low in fiber, making it a great addition to your chicken’s diet.

These are just a few of the nutrient rich herbs you can add to your coop to aide in chicken health! Feed them dried or fresh to your chickens, add them to nesting boxes, or hang them around the coop to freshen the air!

Talk soon!

xx, Lanna

 “The birds are capable of…break[ing]… nutrients… down to their individual pieces and reassembl[ing] them into something that we enjoy eating. This is only possible if we provide them with all of the nutritional building blocks necessary for the job.”

-Justin Fowler
“Nutrition for the Backyard Flock”

Sources:

Brazier, Yvette. “Basil: Uses, Benefits and Nutrition.” Medical News Today, MediLexicon International, 16 Dec. 2019, http://www.medicalnewstoday.com/articles/266425.

Brennan, Dan. “Rosemary Health Benefits, Nutrients per Serving, Preparation Information, and More.” WebMD, WebMD, 18 Sept. 2020, http://www.webmd.com/diet/health-benefits-rosemary#1.

Brennan, Dan. “Thyme: Health Benefits, Nutrients per Serving, Preparation Information, and More.” WebMD, WebMD, 19 Sept. 2020, http://www.webmd.com/diet/health-benefits-thyme#2-4.

Glassman, Keri. “Oregano: An Herb Fit For Your Kitchen and Medicine Cabinet.” WebMD, WebMD, http://www.webmd.com/food-recipes/features/why-is-oregano-good-for-me#:~:text=Fresh%20oregano%20is%20a%20great,vitamin%20E%2C%20tryptophan%20and%20calcium.

Harrison, John. “Feeding Comfrey to Poultry and Other Livestock.” Allotment & Gardens, http://www.allotment-garden.org/comfrey/feeding-comfrey-poultry-livestock/#:~:text=High%20Protein%20%E2%80%93%20Low%20Fibre%20Comfrey&text=Comfrey%20being%20low%20in%20fibre,the%20expensive%20corn%2Dfed%20hens.

Meyers, Michelle. Lemon Balm: An Herb Society of America Guide . The Herb Society of America, 2007, http://www.herbsociety.org/file_download/inline/d7d790e9-c19e-4a40-93b0-8f4b45a644f1.

Nordqvist, Joseph. “Lavender: Health Benefits and Uses.” Medical News Today, MediLexicon International, 4 Mar. 2019, http://www.medicalnewstoday.com/articles/265922.

Raman, Ryan. “12 Health Benefits and Uses of Sage.” Healthline, Healthline Media, 14 Dec. 2018, http://www.healthline.com/nutrition/sage.

Singh, Manpreet, et al. “Nutrition for the Backyard Flock.” University of Georgia Extension, 1 Apr. 2020, extension.uga.edu/publications/detail.html?number=C954&title=Nutrition+for+the+Backyard+Flock#:~:text=Calcium%2C%20phosphorus%2C%20and%20salt%20are,eggshell%20formation%20in%20laying%20hens.

Ware, Megan. “Mint: Benefits, Nutrition, and Dietary Tips.” Medical News Today, MediLexicon International, 4 Dec. 2019, http://www.medicalnewstoday.com/articles/275944.


Our Cozy Chicken Coop

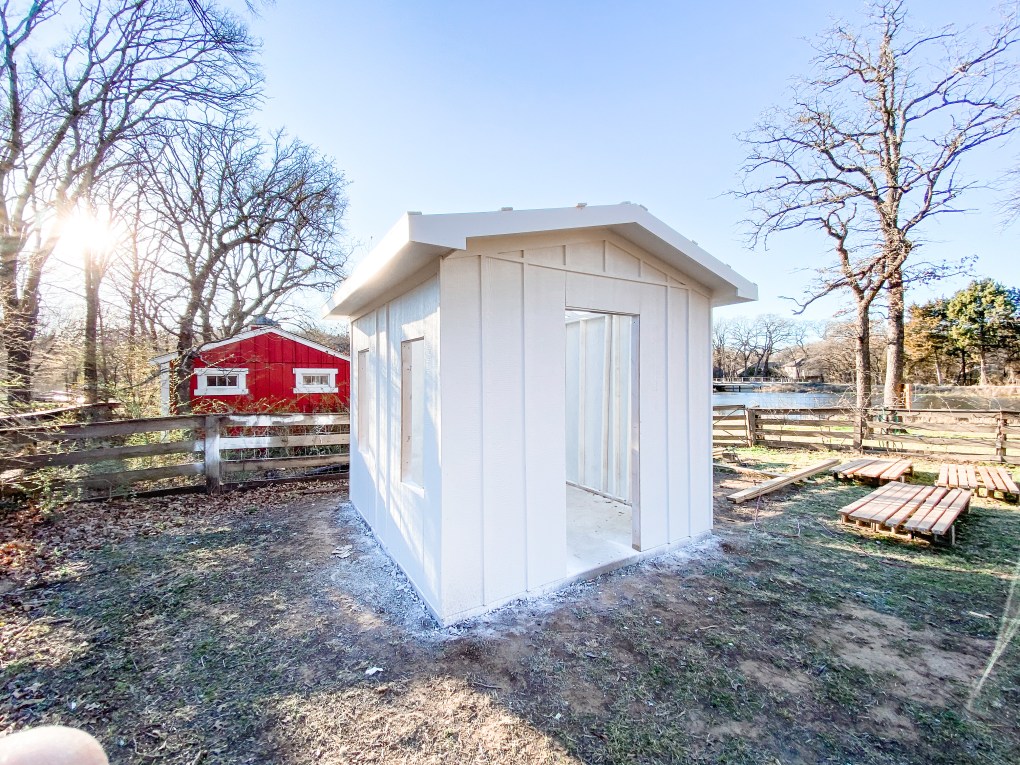
The Chicken Coop (or Chicken Condo) is finally finished! As soon as we saw this property, I saw this empty space and immediately saw the vision for a beautiful garden area with a giant chicken coop and pretty laying hens, so when we got around to starting on this baby, I was so excited. Because we started in January, daylight savings + short sunlight hours, and my sweet hubby’s work schedule, we really only worked on this coop during the weekends up until about March, so it took us about 5 months to completely finish. Keep in mind we did everything with our own hands, but hired out some help for the concrete slab, and the metal installation of roof, so it was totally expected to take up some time.

Be sure to follow along on my Instagram: @theroostingplace for real-time updates and project progress!

For several months we spent all our free time building up this beautiful coop- and let me tell you, every second was worth it. There are more updates and additions to come over time, but for now, I am so happy to have this to a beautiful, functional “stopping” point. Through all the sweat, frustrations, learning curves, and time away from friends, my dream coop was born-and it brings tears to my eyes every time I look at it during the golden hours of evening. I cannot begin to express how thankful I am for a willing husband, and father in law, who were willing to help bring my dream to life. The memories made while building this coop are some that I will surely cherish forever.

For more updates and projects, follow my Instagram: @theroostingplace

We based all our designs off of Twelve on Main’s Coop Plans. Sarah has a gorgeous coop and several other adorable farm building plans, so we bought her plans then tweaked them to fit our needs. Some big differences we made were our concrete slab (highly reccomended for easy cleaning purposes), dimensions of the coop and run, and our choice of roofing material. While we did most of the coop based off our own intiution, it was great to have these plans on hand for reference when we got “stuck”! So lets take a look, shall we!

Click HERE to for FAQ’s regarding the coop build (paint + stain choices, building +roofing materials, etc.)

The Coop

Our coop is a 10’x10′ building and is split into two sections: a front storage area and the actual coop for the hens. The two are seperated by a interior wall lined with chicken wire and an old refurbished screen door that was gifted by my mother in law.

In the front half, we installed some cabinets for storage, a feed bin, (we will probably buy another one for the pine shavings), and hooks that hold the cleaning shovels. There are also doors that swing open for access to the nesting boxes, secured by cabinet “roller clips”.

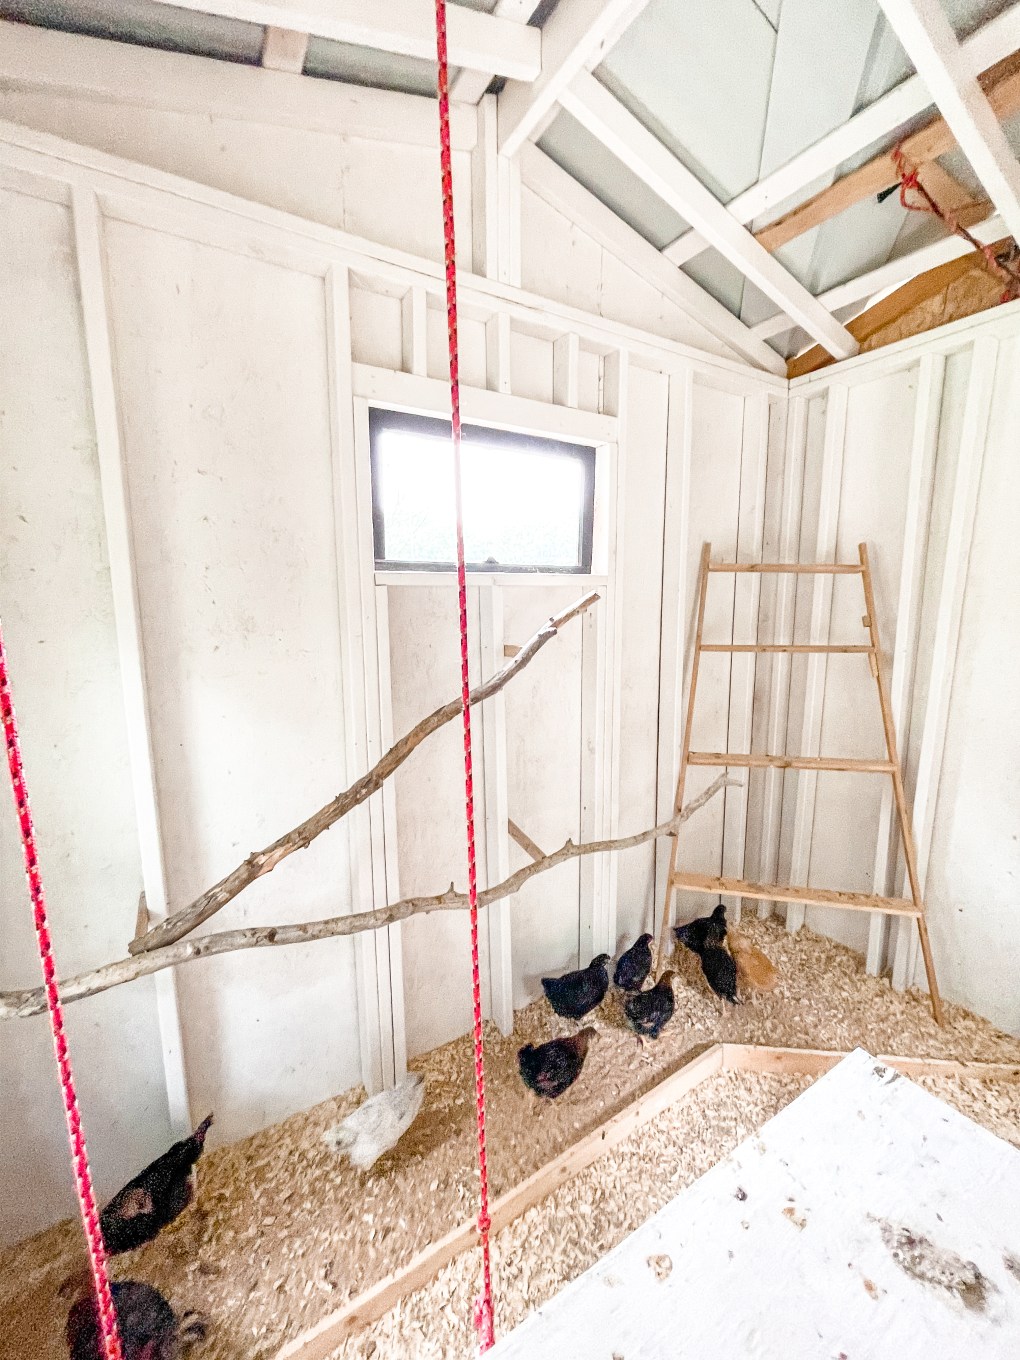
Our enclosed coop has 2 functioning windows, 1 unfunctional (for now) window, 6 nesting boxes, a roosting ladder, and perches made from sturdy limbs collected from around the property. (Of course, the chickens much prefer to roost in the rafters)

Did you know that chickens poop where they roost??? For this reason, I also included a chicken “litter box” underneath all the perching zones which is filled with sand to hopefully make the cleaning process simpler. Will keep you updated on this endeavor, right now the sand makes the coop extra dusty, as they love to dust bathe in the sandy areas.

***EDIT: The chickens ended up spreading the sand everywhere, so removed the sand barrier and now leave a layer of sand on the whole floor, then cover with pine shavings.***

The Run

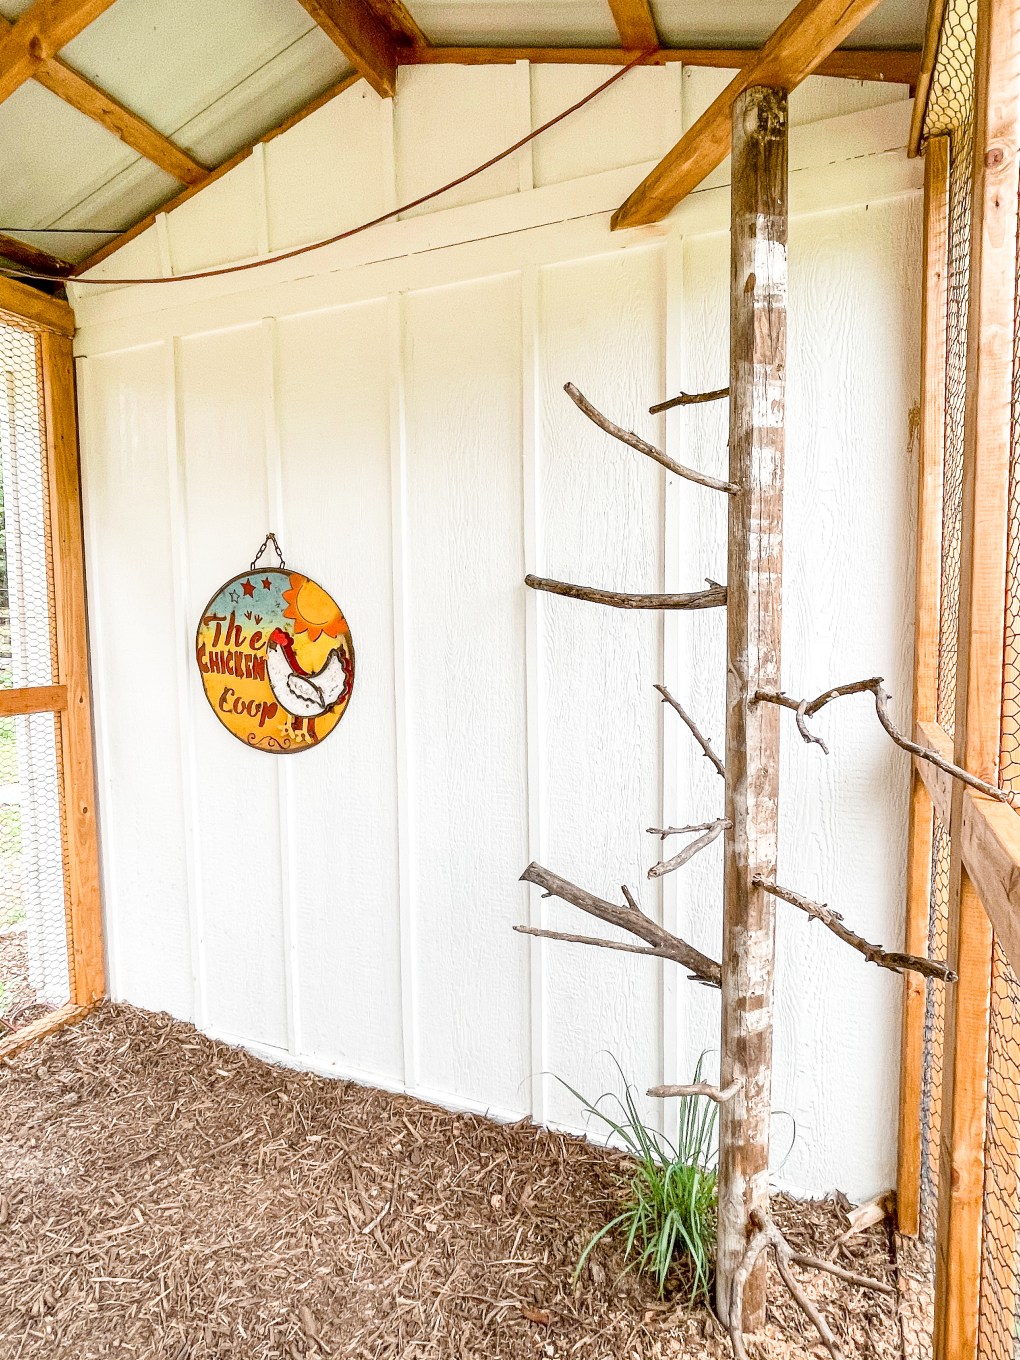
Our run is approximately 8’x12′. We opted not to allow our hens to free-range, as we have several predators like hawks, bobcats, and coyotes that frequently pass through our property. To accommodate, we created a completely enclosed run, which shares a roofline with the coop. We lined the bottom of the run with chicken wire, then covered it with mulch. This way, the hens can roam inside and out of the coop freely, all while minimizing the risk of predator attacks.

Inside the coop are several chicken-friendly herbs and plants, which are separate from my herb garden, meaning the chickens are free to peck and eat these to their heart’s desire, all while providing nutrition and protection. If these ever get too picked over, it will be easy to place a cloche over these plants until they have recovered and can be consumed again. To read more about chicken-friendly foliage and some benefits, click here!

***EDIT: to read some an updates and adjustments we have made to our coop and run since the initial build, please click here.

We also built the chickens a roosting tree out of sturdy branches found on the property, as well as made a chicken swing to keep the ladies entertained!

For those of you wondering, yes, there is a door to the run from the coop. We ordered an automatic door from Omlet, and at the time of publishing this post, the door has not arrived yet. It will be placed approximately in the center of the run to the left of the roosting tree. This battery-powered door will allow the chickens to enter the run at a set time, and then safely enclose them inside the coop in the evening at another set time. I’m very excited about this feature and cannot wait to share more with you about this automatic chicken door.

***EDIT: The run door did come in, and is an AMAZING addition to the coop. To read a little more about the updates we have made to the coop, please click here.

Over time I aim to add several more fun details to this adorable coop (think chandeliers and fun signs)! We also plan to hire an electrician to wire this baby up, but for now, we are packing up the tools and are ready to move on to the next project! We have so many more garden area projects in store: new fencing, more garden boxes, a greenhouse, and ground covering/pathways, I wonder what we will tackle next?

Be sure to follow along on my Instagram: @theroostingplace for real-time updates and project progress!

Talk soon.

xx, Lanna


DIY Upholstered Headboard

Hello friends! We have finally made it to the final project that completes this Murphy Bed: a headboard! I knew that this space wasn’t fully finished until I added this special detail, and I feel like it pulls everything together perfectly. (I’m pretty sure my pups think this bed was made specifically for them!)

When we decided to build a murphy bed into this space, my biggest caviat was the appearance of the structure. This addition needed to be a part of this house, and I still wanted to give a cozy, homey vibe while maintaining the multi- function purpose of this room. I think we have done a pretty stellar job achieving that goal, but when I pulled the bed down, the space just looked…unfinished. So I decided to DIY a beautiful, soft, comfortable headboard! Here’s how I did it:

You can find real-time projects and updates on my Instagram: @theroostingplace

Materials:

  • 1 sheet 3/4″ plywood (If you want a sturdier headboard, use 1″ plywood. I opted for the thinner so it fit inside the folded bed)
  • 2 rolls of 24″x72″x1″ project foam (you can also use thicker foam and buy it by the yard if you want, I found this was cheapest)
  • Quilt Batting
  • 2 yards upholstery fabric of choice*
  • Staple Gun + 3/4″ staples
  • 29 buttons of choice
  • Super Strong Fabric Glue (Aleene’s or E-6000 work great)
  • 1/2″ hooks
  • Hanging wire or D-ring hangers

The Process

Determine the desired shape of headboard, then draw it out on the plywood. A standard queen headboard should be 62-65″ wide, depending on the amount of hangover. (As for height, I made my headboard 3 feet tall at the highest point, which I feel is pretty standard. You can make yours taller, just keep in mind that the amount of extra material you may have to buy.)

I opted for the “cleveland” style. To draw out a rounded top, use a pencil and attach a piece of string to it. Hold the other end of the string, and pulling taut, use the pencil to create an even arch. I then used a bowl to get the extra curves on my edges. Using a jigsaw, cut out the drawn shape.

Next, lay out and stack batting, then foam, then plywood. Mark out the edges of the headboard giving an additional 2″-this will ensure enough material to wrap over the top of the board and be stapled to the back.

First, staple the foam by pulling the pieces tight over the edges. Start at the “break” between the 2 pieces of foam and staple the sides first to prevent a split in your foam. Then pull the edged tight and staple all the way around. Repeat the process with the batting. (Batting diminishes the appearance of the split in the foam. You can double the batting up if you wish.) Even with my goof split, my batting hid it and paired with the upholstered divets, this isn’t noticable at all.

To create the upholstered look, flip the headboard over to the front, then lay the material over the top. It is important to not attach the edges first to ensure there is enough slack for the divets. Meausure out placement for the first divet- I chose 12″ apart and eyeballed my first placement. Use the stapler to make an X and create a divet. Measure 12″ over and down and repeat until there are enough to make you happy.

Once all the divets are made, flip the headboard back over and staple the fabric around the edged and to the back, pulling the fabric tight to avoid unwanted wrinkles. *(tip: when picking your fabric, check out the sale fabric section! I got 2.5 yards of fabric for 50% off the original price plus most places will give an additional discount for buying the end of bolt*

While you are back here, attach your hangers! Use a level and a measuring tape to screw your hangers of choice into the back of the headboard. ** (I used wire and screws because I didn’t want to go back to the store, but you can also use d-rings to make your life simpler.)

Flip the headboard over again and use the glue to attach buttons. Let the adhesive dry before moving the headboard to a vertical postion to ensure best adhesion. While the glue dries, let’s attach our hooks to the wall!

Because my support board for the murphy bed was a few inches off the wall, I used a stud finder to locate studs and screwed a 2X4 into the wall as an “extender” so the headboard could sit flush. Using a drill bit, first make a small pilot hole, then screw the hooks into the wall. Make sure to measure out the distance of your hangers then place your screws. If you are attaching directly to the wall, skip the 2×4 step and simply insert your hooks directly into studs. **Also, if you aren’t attaching to a 2×4, you will want to locate studs first before attaching the hangers to your headboard.**

Last step is to hang it up and to stare blissfully at your beautiful creation! The end! Mine sits perfectly when we fold and unfold the bed, and gives such an elegant final touch to this space. While it has it imperfections, I’m overall super pleased with the look and cozy feel it brought to this room! Now my guests have a place to comfortably rest, and I hope gives them a home-away-from-home comfort.

Let me know if you make one and if this method works for you!

Talk soon,

xx, Lanna


Naturally Dying Easter Eggs

Did you know you can dye eggs using igredients that can be found in your kitchen? I thought this was so cool and wanted to try it out for myself to see how it works!

There are actually a ton of things you can use to create a natural dye, but for me, I tried out purple cabbage, red wine, yellow onion peels, blueberries and Tazo’s passion tea!

Boil your eggs. I always allow my pot of water to come to a rolling boil, then remove from heat and add my eggs. I then cover the pot and let them sit for 12 minutes.

You then want to boil each ingredient in water seperately to make a dye. Once the dye is a few shades darker than you want your egg to end as you are ready to dunk the boiled eggs. ( I should have added vinegar into my mixture, as I read in hindsight that that creates a deeper, stronger dye color.) I tried making the cabbage dye with two seperate methods: one method is boiling the cabbage plain to yield a blue, while the other method adds a teaspoon of vinegar and yields a reddish-pink!

Depending on your desired color, and how well the egg is taking the dye, saturation time will vary. The longer an egg is left in the dye, the richer the color. My red wine eggs turned the quickest after only 10 minutes, while my cabbage and vinegar mixture did not take at all after sitting well over an hour. I think I may have added too much vinegar by accident.

I was surprised that the color took differently than I had originally expected. The tea picked up a beautiful gray tone (when I expected a pink), as well as my blueberries (I was using really old blueberries, so I am curious what these would have looked like had I used fresh produce!)

There are so many other ingredients that can be used: tumeric, coffee, beets and spinach, just to name a few! I am eager to try a few more of these, and also see how adding vinegar into my boiling water and ingredients will affect the color of the dye (I have read this will make a deeper color, so definitely worth a try!) I counted this as a learning experience and had so much fun giving it a try!

Would you try to dye eggs naturally?

Talk soon,

xx, Lanna