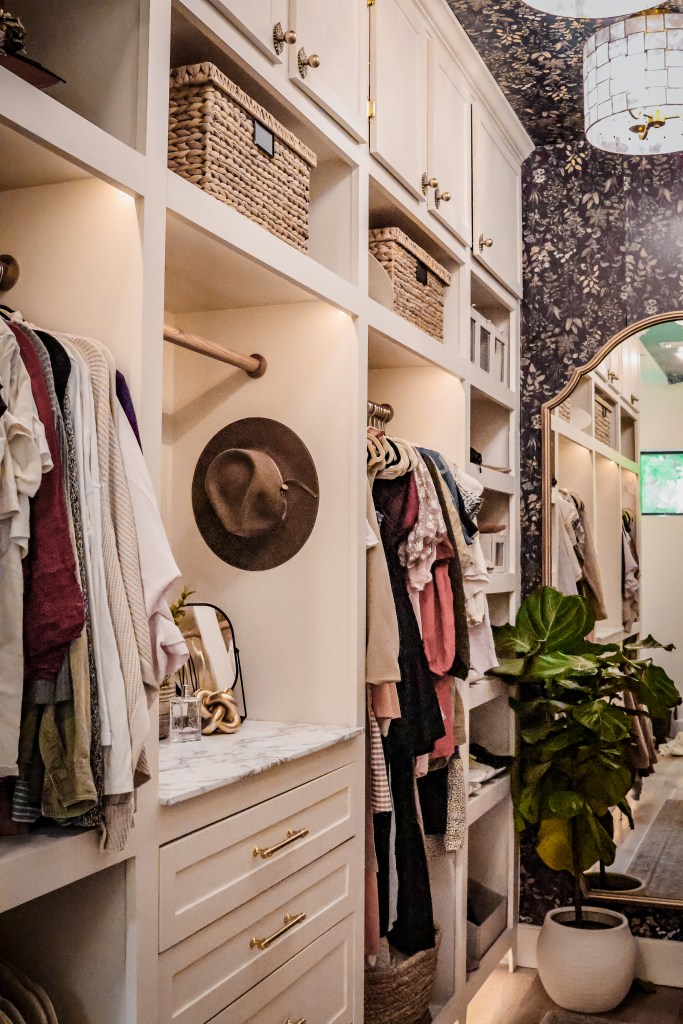
After 7 weeks of off-and-on work, my dream closet is DONE! There is something special about working hard for something and reaping the fruit of your labor, and this closet is no exception. Since we started planning our home build, I always knew I wanted to build out our primary closet myself. It’s a challenge I have been preparing for over the past couple of years of DIY projects, and every lesson learned has brought me closer to my closet.
This post is primarily for photos, so to pop on over to my Q&A blog please click HERE.
My first endeavor regarding cabinets and drawers was our barn workshop! Because I knew that the barn workshop was going to be a temporary fix to a long-term problem and that we would be moving our “workshop” to the garage after the build was complete, I took this as an opportunity to learn and grow my skills. (Drawers are still hard, but I did get better this time around). I applied a lot of the same concepts from that project to the closet project. (Click HERE to read how I build my cabinets).
I am in awe every time I walk into this closet. For me, there is so much sentimental value in this space because it marks the end of a stage of life for us. During our 2.5 year time in what we refer to as “the Limbo period”, we had limited space in our 700sq ft home. We lived out of boxes and bins, and things were never quite settled or put in place. I held onto things in storage because we never expected to be waiting for our Home for so long, and there was always an air of discomfort knowing our physical belongings were scattered. And then our little house flooded and that feeling was only amplified by the unknown timeline of moving forward.
But now, I go through boxes. I add items to the discard or donate pile. I hang my belongings and carefully fold them in the drawer. I am at peace. I am Home.
Click HERE to find all products I saved to my LTK.
Hello friends! The closet is done and after working part-time on it for the past 7 weeks I can’t tell you how elated I am to finally have a place to put our things! Honestly, between 2 vacations, hosting parties, having crews here for punch list items, being sick, and just plain old life, I don’t think 7 weeks is too bad given the fact that I can say I DID THAT! And, because my quotes started at $15,000 I saved myself a lot of money.
(note: $15k is reasonable for someone to charge for a closet this size. But because I have the time and ability to do it myself, I chose to go that route instead).
Of course, there were times when I had to ask for help-have you tried lifting or cutting a 3/4″ 4’x8′ sheet of plywood yourself? They can weigh up to 80lbs and yours truly is only 5′ tall. I am so grateful to have a husband who not only supports but highly encourages my DIY mindset. It takes a lot of patience to be married to a go-getter like me, and I cannot thank him enough for being willing to lend a hand or help problem-solve to figure out the best step forward. That’s just what partners do-they help each other.
I have compiled a list of FAQs because I think that is going to be the simplest way to answer the mass questions I have had pour in from a viral post on Instagram. (Some kind and inquisitive, others, not so much.) Of course, there will only be a handful willing to find and read this post-so thank you for being here! I absolutely love being able to share my experiences and lessons with you all, and t brings me joy to hear how I have encouraged you in your own projects!
All trim work was done with 1/2 premium pine boards.
How do you plan out your measurements?
I am not a professional and won’t claim to be. I don’t have any fancy software: I draw it out on graph paper and use painter’s tape to get the scale how I want it. It’s all backward math from there. If your wall is 11′ long, and I want 4 cabinets, divide 132″ by 4 to get 33″ wide cabinets. then subtract if you want any gapping or thicker trim. ALWAYS REMEMBER TO ACCOUNT FOR THE THICKNESS OF THE MATERIAL WHEN MAKING CUTS.
Do you have a tutorial?
While my closet highlight goes through a majority of the process, I followed a similar build style to that of my Barn Workshop Project. This was my first trial and error with cabinets/drawers and I have a lot of helpful information there. I will say that for this project, I used instead of MDF, I used all plywood for a stronger product result.
What kind of tools do you need for this project?
I would not recommend this for beginners, because you have to have straight and accurate cuts. Start with a smaller, singular cabinet or drawer base and then gauge if you are ready to take on a larger closet. There are also many DIYers who have upgraded IKEA PAX units with great success and those require less expertise if you are intimidated by building a whole cabinet.
Technically, you could do this with a circular saw, impact drill, Kreg jig, tape measure, level, square, stud finder, and a brad nailer. I recommend also having a table saw and a miter saw (or have your large cuts done at Lowes for $1/cut) to get the best cuts. Other useful tools to make life easier are clamps, a circular sander, a drawer jig, a dato and a hardware jig.
I did not pay for labor. Yes, my time is valuable but it is also my job to complete DIYs around my home and property and share them on social media platforms. I will disclose that we also have contractor discounts set up at multiple hardware and paint stores, which give us a slight discount on products. I did not have to buy any new tools for this project but above listed what I used.
Not included in this cost is what I gave our painters who were already here for construction punch list touch-ups to spray the cabinet bases. They work on a day-to-day- rate, so if you want to get technical add $500 for the 1/2 day they painted for me while I was out of town.
How much time?
I can’t give a full compilation of hours because I worked on this off and on for 7 weeks when I had the time.
Would you change anything?
Overall, I am happy with the results. Looking back, I would do a few things differently:
I would not caulk my drawer and cabinet faces. They look a little messy and I spent extra time trying to clean them up. Instead, I should have gone and bought some 1/4 solid wood to trim the faces with.
I think I am going to add a few more shelves to my shelving units for shoes.
Ultimately, I did not want my cabinet doors to overlap or to have a “floating style” but this resulted in an error of not measuring twice, cutting once. For time and sanity’s sake, I chose not to purchase more wood and redo them, maybe one day I will, but they’re good for now.
Every project is live and learn, and despite the errors that I made, I absolutely love what I built.
In some ways, I am thankful that our home has taken 2.5 years to come to fruition. I have learned a lot about myself in the past couple of years, specifically, I have really come into my own design style. I am no longer afraid to branch out and try some unorthodox (for past Lanna) methods. I am not afraid to do things differently than the trends are highlighting.
This being said: I originally envisioned living in a white-painted brick home. When we were working with our architect, almost every inspiration photo I sent her was white brick, with wooden accents, and a black roof. I was convinced that I needed a crisp, white modern farmhouse that looked like all those beautiful ones I have admired in magazines and on Pinterest. Until I saw one in person. Then another. And another. I was a little blinded by the number of white brick homes I began to see everywhere. They felt like copy-and-paste versions of a trend that will fade in a couple of years and then what happens when everyone wants natural red brick again?
Don’t get me wrong here: if you love white-painted brick exteriors, that is amazing, and I encourage you to explore that with your own home if that is what you wish. I still think they are beautiful. But, for me, seeing the same white brick all over every home made me want to do something…different.
So I started thinking about what I wanted our home to be for us. I want to come home every day and feel in awe that I am blessed to live here.
So I started thinking about what I wanted our home to be for us.
Enchanted, Dazzled, Delight…Captivated. Captivated and embraced by the feelings that home encompasses. Many of these feelings have been stirred ironically when I have been furthest from home and exploring places around the world. I have been captivated by European buildings that have stood for hundreds of years, wearing every scar and wrinkle with pride. I have been delighted as I have walked through old downtown shops full of stories. Oh-if buildings could speak, what would they say?
At first, I didn’t know how to achieve this feeling on the exterior of my home, but I knew I wanted every aspect of my home to reflect those feelings of enchantment that have brought me tranquility down to my core. I wanted to blend that old-world feel of comfort with modern design. So I began searching. I needed to keep a rock/brick design element because our foundation had already been poured with brick ledges. I immediately thought of Austin stone to give me texture, but too much yellow reflection in the sunlight. So my search refined slowly from white homes to gray stone.
And then I found Horizon Stone, a company out of Chattanooga, TN that manufactures thin stone veneer (it’s actually made of cement and coated to look like beautiful stone!)
When I clicked on their site and started exploring more I read: “…blending the best of old-world stone structures and modern technology, we affordably offer the timeless look of stone with the modern convenience of custom manufacturing.” There it was. Old world. Modern. A perfect match in my books. And affordable?? I order a sample of their 19th Century Stone in Hermitage.
I also ordered some other stone veneer samples to compare because I was nervous this product would surely not live up to its more affordable cost (from the stone yard we purchased from it was $6.50/sq ft, and this was comparable to what we would have paid to have brick installed, then painted!) Let me tell you, none of the other stone veneers I ordered could hold a flame to the color and texture that was on the Horizon Stone sample board.
So we ordered it.
The delivery sat on our job site for 6 months before we finally got to the stage where our masons could install it. But let me tell you that when they were able to install I felt like a kid on Christmas morning. Enchanted, Dazzled, Delighted, Captivated. And the masons even took the time to teach and show me how to lay the patterns and install the stone veneer myself, so while they definitely did 98% of the work, I can feel proud knowing that I had a hand in laying the stone of our forever home.
What’s even more exciting is the fact that we ordered too much stone! So we were able to also install it on our retaining wall, and even have enough to face the fronts of some add-ons we have planned down the road (Like a new barn and a workshop!) I cannot wait to continue to use this stone veneer as a way to tie our property together and to feel like we have brought a piece of history here, all while making our own.
FAQ’s
What is the difference between manufactured and natural stone?
Natural stone is made by nature and is quarried and cut into various shapes for different uses. Manufactured stone (also known as a stone veneer or cultured stone) is made of a cement mixture that is poured into molds and colored to look like real stone.
How much per sq ft did your exterior cost?
Prices may vary depending on the stone yard, your location, and cost inflation-but when we purchased ours it was $6.50 per sq ft.
Yes! We have several additional structures planned (a workshop and a new barn) for our little homestead and I plan to use this stone veneer to tie all the buildings together!
I cannot wait to show you all more photos of our exterior as we get landscaping finalized! It’s going to be good. You can always stay up to date with the most recent updates on my Instagram: @TheRoostingPlace
While our future home is still well under construction, I recently shared on Instagram the design board for our mudroom and decided to share links to all the pieces that have inspired this room in our home!
I have to first include some honorable mentions that inspired my mudroom design: (you can find these and more on my Pinterest)
Hammers N HugsMonica HibbsKatarina Brucks
I love how all these spaces meld together with warm tones to give the most inviting spaces!
Click through below to find my sources! I’m super happy to have found most of my tiles at local discount stores over the past year and all that saving allowed me to buy the brass fixture of my dog wash dreams!
My thin brick pavers are coming from Stone Farm Living and I cannot wait to install these Reclaimed Chicago Bricks in my home! Stay tuned for more details because I will be able to get my hands on this space very soon!
“Cozy, comforting, connected”. That’s how I envision my dream bathroom. We have lived in our share of homes and visited our share of bathrooms, and the ones I fall in love with are the ones where I feel like I can truly breathe and relax ( of course also the ones with a large soaking tub). Personally, I don’t like a ton of bright whites or cold marble tones, not in my bathroom. I understand the draw to white bathrooms, I really do. They can feel clean and happy. But for me, I need my bathroom to be a true reflection of nature, with wood tones, warm stone, and earthy elements; so if that is you too, welcome.
I am inspired by dramatic metals paired with wood graining. Something about a sauna enclosed with wood makes my heart happy, and I wanted to incorporate that feeling into our home.
Our bathroom is composed of several “sections”: vanities, wet room, and toilet closet (in addition to my personal vanity that is not included in these design boards). There are several directions this space could head, depending on how the room feels once we have reached that stage in construction.
But for now, let us explore the possibilities, together.
As always, you can see more updates on my Instagram: @theroostingplace
Vanity
I was hesitant about the window between the vanities at first, but it has grown on me as this will allow for natural light to filter in through our shade, reducing the need to turn on the overhead lighting. I love how wood planking and beams will draw the eye upwards and give a natural feel to the space. It then comes down to design elements.
I am breaking up these designs into Option 1: light flooring, and Option 2: dark flooring. I am attracted to both ideas, but it will ultimately depend on the space.
Option 1: Light Flooring
1.a dramatic dark vanities and a lighter moody green wall1.b brighter tones and natural wood vanities1.c natural vanities with a moody green wall
Option 2: Dark Flooring
2.a bright wall2.b moody green wall
As you can see, each option can be turned in different directions, all being beautiful in their own unique way.
Wet Room
“A wet room is a fully water-tight bathroom with no separate shower tray. The “walk-in” shower area is usually level with the surrounding floor but with a slight slope to the drain which is fitted directly into the floor…a wet room typically contains a shower and a tub.”
Our wetroom will be equipped with a steam shower, two shower heads, and a soaking bathtub. The back wall behind the tub will be an antique tile and accented by a chandelier (most likely a candle holder to avoid any electricity risks of a steam room, and honestly the idea of a candle-lit soak makes me giddy).
The design of this space also depends on our flooring choice, as we will incorporate the same tile into the wetroom.
I personally love both looks alongside the brass details.
Toilet Closet
Just your average toilet closet, but make it fancy. I’ve included boards that showcase both flooring options.
I am extremely excited to work on bringing this relaxing space to life, and can only hope that this is a space of true relaxation for decades to come.
What’s your favorite: dark or light flooring?
Talk soon and God Bless.
xx, Lanna
p.s. (If you see something you like and would like more information on any items/elements in these boards, you can purchase my link sheets below:
Relaxing Natural Bathroom: Dark Tile Floor Edition
These link sheets are complete with active links to all elements and design suggestions in the images above for you to peruse and buy at your own pace! Happy Shopping!
It is time to finally talk about the design elements of “Big House” and what inspired our choices. I am going to try to give some credit where credit is due, but I cannot always find the sources of inspiration, and to those to whom these photos belong, I apologize.
To find more updates regarding our home build, find me on Instagram: @theroostingplace
The exterior of a home is the first impression. This is the first space the eye sees when entering a home for the first time, and I wanted to be left in awe every time I drove up to our home. I love crisp lines of modern black windows and sleek white exterior tones. I love the warmth old world stone and how that earthy material connects us to the past while we create our future. This mixture of metal and stone could not be complete without wood elements, so naturally, we are incorporating lovely wooden headers and beams.
I hope to reflect the feeling of warmth and comfort when guests enter our home, and I hope that for now, that feeling radiates to you as well through the photos that inspired us.
To see what material we used for our exterior cladding click HERE.
From left to right sources: unknown, Sterling Roses Blog, unknown, Style by Emily Henderson, Studio McGee, AllSortsOf.com, Luxesource.com, unknown, Linda MacArthur Architect
Mock-Ups: by Harper Design Projects
To see what material we ended up using for our exterior cladding click HERE.
After ten months of back and forth with the city, we finally received our permits to build the big house! And now that we are off the crazy rollercoaster, I can finally take time and unpack what exactly was happening during the last 10 months.
The past months have been so emotionally and mentally draining-I would be lying if I said it was easy. I won’t be saying what city we live in for security purposes, but our experience with the planning and development department was extremely frustrating. Below, I want to outline a rough timeline of our permit process, so that anyone reading this can be aware of our permitting journey, and can mentally prepare if they are considering building within city limits.
I will disclaim: our property is a rare find (5 acres with a pond inside the city limits of DFW), so since there are not a lot of properties that are like ours, there were several bumps with everyone figuring out the best way to navigate our situation, some we foresaw, others being complete curveballs due to lack of communication on the city’s (and hired professional’s) part.
You can follow along with the journey on Instagram: @theroostingplace
Because this is a recount of events over the last 10 months, I cannot even begin to replicate the rollercoaster of emotions that were felt. There was anger, there was a glimmer of hope at progress, then heartbreak when we had to yet again add/change something else. I had lost the ability to be excited when we heard good news, becasue I felt like there was something bad that would follow. It seemed that every one of Harley and I’s phone converstations started with “do you want the good news or bad news first?”.
But we made it.
December 2020- First contact with the City Planning Department
We first contacted the city planning department in regard to requirements for permits. We were informed that because the proposed site location for the house was more than 600 feet from the main road/existing public fire hydrant, we were required to install a private fire hydrant on our property. In this correspondence, we were told we needed a pre-approved utility contractor to execute a 3-way contract and provide construction plans prior to permit release.
Okie no problem-o.
What we didn’t receive was a list of required documents to submit, so we started gathering all the obvious: architect sets and floor plans, window schedules, engineered foundation…etc.
January 2021- “Proper Procedure”
We were attempting to go through “proper procedure” to locate previously approved fire hydrant permits that the previous owners had applied for. This pretty much meant filling out forms and jumping those hoops for “public knowledge” documents that are in the city archives. We were hoping by using the same previously approved plans that would speed up our process. Newsflash to us, we don’t get access to those documents. *eye roll and one month wasted by going in circles*
Throughout this time we were also getting estimates from our sub-contractors to put together a budget to turn into our lender for funding. No official submissions just yet.
February 2021- “It’s on the website”
After reaching out to the city for a list of required documents (again), we were told all the information we needed was “on the website” in regards to what needed to be submitted. So we look online and try to compile all the paperwork and sets that we could find was required online. This included our architect plans and engineered basement plans, along with a couple other documents. The website was pretty vague on what to submit, as we could not find a specific list. But we did our best here.
During this time we started experiencing problems securing our loan due to changes implemented during COVID-19. So we were tracking down documents to secure that process. (Building loan into a traditional mortgage once building is complete).
March 2021- “I gave you a list!”
We submit our first rounds of permit sets through an online portal mid March and paid the first rounds of fees (half of the total) that were required to get the permit process started ($3,261.62)
Our loan was approved-we had funding!
We were informed we had submitted incorrectly and with inadequate paperwork/plans. They would not even begin to review anything until we completed the “Residential Submittal Requirements” that was attached in an email but should have been accessed online prior to submittal…this document was not found on the website. This was the first time we received a checklist for the process. So we began completing that paperwork/ contacting subcontractors who could provide the missing pieces.
What was required to submit: Site plan (check), Floor plan (check), exterior elevations, door and window schedule (check), wall/wind bracing method, energy compliance, engineered fondation (check), water utility application, park/roadway impact fee paid, and an SWPPP.
We had a difficult time clarifying some missing pieces and getting correct links to paperwork the city required.
April 2021-Finding the right people
We were still trying to receive the paperwork required to resubmit. We had to hire an engineer to show wall/wind bracing, contact our lumber company for a set of framing plans, and contact an energy code inspector to fill out our energy code compliance, all of which takes time. We also learned after doing our own research that we only needed to fill out parts of certain paperwork because this is a residential build and under a certain square footage. (It would have saved time had the city planners told us this, but they didn’t.)
The frustrating part about permits is that you cannot control how fast people work, and there are usually more people/projects ahead of you that have to be addressed first; so despite us reaching out quickly, things take time. That’s pretty normal and is expected during things like this.
May 2021-Time ticks by
We submitted again the first of the month, and received our correction report within 4 days. I will commend them in saying our corrections came back within 5 business days each time, which was nice.
What wasn’t nice was that our first correction report was 7 pages long. Some comments were easily fixable, like a window accidentally being missed on the energy form, or that one set of plans was missing a seal stamp. We were also told that our basement needed an egress, so we submitted to our architect to revise the plans.
What we weren’t expecting was how many comments were involving our lack of fire hydrant plans-which we knew we didn’t submit yet, we were still tracking down a subcontractor to do all the paperwork. We became a little overwhelmed at the extent and even vague statements that were included. This was a whole other can of worms to dissect.
This was also when we contacted/hired a civil engineer to work on elevations, grading, and other issues addressed in our sets. We chose to go with the civil engineer that had worked with the previous owners for their project, because we assumed she was familiar with our property and would be able to expedite the process a little bit-we were very wrong. I try not to speak poorly of others, but as an honest review regarding her business methods: she was extremely unprofessional, rude, and unhelpful throughout the process….it seemed like she had just as big of a power trip as the city, and we hired her.
Hindsight is the best sight…but we signed a contract with her and got stuck…
She did get the job done in the end, and I’m sure she’s a loveley person deep down, but we did not work well together. I do not think she is used to working with people who have an idea how to read codes or do their own research regarding building when it comes to dropping major amounts of their budget…more on that later.
June 2021-Just move the house, dangit.
Civil engineer advised we move the house site back to avoid our flood drainage easement. Harley scheduled a meeting with her to discuss how much we needed to move the house-we really did not want to move it too much because the line-of-view would change by moving it back. We ended up agreeing (in email) to move it back to the advised location. Our civil then gets confused regarding our driveway design and hypothetical pool drawing on the architecht conceptual plans, so Harley calls her to clarify and tells her to move the house to her suggested location to be further from the flood plain.
Here’s where things get begin to get a little messy: She then proceeds to advise us on our fire coding, but because we read the codes we understood that because we were putting in a sprinkler system inside our home, we would not be required to build a fire lane. She was telling us that we would need sprinklers($10k), a fire lane (24′ wide of 6″ concrete) all the way from the main road back to our house (a 600′ driveway…imagine the $$$) AND install a fire hydrant ($45k job btw). We informed her that we read the codes differently…so she starts to fight with us…like a child throwing a fit, and just tells us repeatedly we are wrong and that we won’t be able to build without all three. This all could have gone more smoothly had she been willing to explain, or suggested a solution, but upon being questioned she immediately went into “defense” mode, and it was difficult to work with her from this moment forward. Oh-she did tell us to contact the fire marshall, but in a tone that was going to be a “I’ll let him tell you you’re wrong”…
She also sends us “new sets” but they did not have the revised house location. When we confronted her about it she tries to lie and say that Harley told her to keep it at the old location…when we have emails that clearly state otherwise. And her sets still show a full concrete fire lane even though we asked her to remove it. So we told her we did not want the concrete fire lane included because if that was “approved” then we were forced to add it-and we didn’t need one. At this time we also asked her to leave off fire hydrant plumbing because we had not confirmed the code requirements with the Fire Marshall yet.
In her response, in all red underlining, (this is a professionally licensed individual) I quote:
“I have a reputation for providing acceptable designs. You are asking a lot to ask me to change my reputation. I do notsubscribe to the reputation of someone who tries to see “how much they can get away with.” I have invested so much time in your project that I will continue down this path with you for this submittal. However, you are trying to get me to take short cuts that are not in your best interest. At some point, you will decide the time is also of some value and the multiple reviews will start costing enough time that you will be willing to construct this as required. However, we can both spend a little time at the beginning if you recognize what you are doing.”
Yes…we hired this lady…and she just told us we were cutting corners, all because we wanted to check the code requirements with someone who knew it. (Civil had even admitted to not fully understanding the codes.)
An added note: When she says she “spent so much time”…she went on vacation for two out of the three weeks that we had been in contact with her…
I set up a meeting with the Fire Marshall to clarify what was required for our property to be within code.
July 2021- Invite the Fire Marshall over for drinks!
We schedule our meeting with the Fire Marshall after the 4th of July. He had hands down been the most helpful city official for us during this process. During our meeting he tells us that because we are having a sprinkler system, we only need to add a fire hydrant within a 600′ radius of our house-no fire lane required. *Everyone breathes with me: this man just saved us $200k worth of concrete we didn’t have in our budget*. Harley now has his personal cell and you better bet he is invited to our housewarming party when this thing is all over.
We get written statements from the Fire Marshall stating what was discussed in our meeting and send to the civil engineer so that she can give us our sets for submittal. Get this: SHE STILL REFUSES TO SEND US A STAMPED, OFFICIAL SET and tells us “I don’t think it’s going to fly but try this”.
But we submit again with requested corrections. And get another correction report. Shocker… we work to correct any comments made…some of which were duplicated due to lack of official stamps…when we sent the report to the civil engineer, she made the comment that “we must have forgotten to include all the pages”. So clearly she doesn’t like to admit she’s in the wrong.
We are also trying to get our fire hydrant contract from our sub-contractor during this time.
August 2021- Fire hydrant from h***
We had to switch companies regarding our fire hydrant…we got ghosted. At this point, there were no more comments regarding our build, just a few left on the fire hydrant and the civil sets. Since we were still having issues with the civil sets anyways, we did ask the house to be moved back once more- I knew this was not going to be taken well by the civil, but she works for us and we were extremely nice about it. (She didn’t like it of course but complied).
Because our foundation crew had availability in their schedule, we ask our project manager at the city if there was a way we could get a partial permit to start digging the basement. The city then responds and states that they will not issue any permits until the fire hydrant is INSTALLED and functional…may I remind you this is not what was stated to us 6 months back. You bet your booty we called the Fire Marshall. He then called the city for us and told them that all he required was a working contract with a finish date and we could receive permits. THIS MAN IS AN ANGEL.
We submit our plans again with corrections. And receive comments regarding our civil sets…we inform our civil engineer to fix the issues.
September 2021-Oops, must have missed it.”
The civil engineer calls an engineer at the city who is making comments. She is then told that our cover sheet (which is our conceptual architect drawing) does not match the civil plan therefore the engineer WOULDN’T EVEN LOOK AT THE CIVIL SETS. Y’all. In 4 months this woman hadn’t even looked at our plans! But never told us all we needed to do was draw a big “X” on those sets and state that during our build we were using the civil sets…
So I draw a giant “X” on the conceptual drawings and resubmit…hoping that’s all. What else do they want?
Despite the small movement forward, we are still having issues getting a hold of city engineers regarding questions about our 3-party fire hydrant, which we are trying to submit. We were told that this was all we had left to receive permits…
Until the biggest curveball of all: on September 30th, we were told that our civil engineer was not “aware there was a basement” and the city “must have also missed it” because we couldn’t build our house as planned with the basement, due to a code that stated that areas in a special flood zone can’t have an elevation below a certain point. The issue with that statement: we aren’t building in a flood zone.
We set up a meeting with city engineers, our hired civil engineer (I wish she didn’t have to be there), building officials, the city project manager, and our basement expert to discuss this outrageous claim. Why hadn’t this been mentioned before? Why was it being mentioned at all, it doesn’t apply? There was no way the city engineers “missed” a basement design plan with multiple engineered documents…unless they haven’t been doing their job this whole time?
October 2021-Emotionally drained
This meeting was a crapshoot. We walked out feeling belittled and infuriated by engineers who assumed we had no idea what we were talking about, even though we are well versed in the city’s codes and the FEMA policies regarding flood plains. This engineer even had the audacity to throw his degree around…the room was split between the people who were haughty and power-struck, and those who realized there had been a huge mistake and the city was liable. Their excuse: “oh, the computer system must have not transferred our comments over”. It took me visibly having tears in my eyes (I tried so hard to hold them back but I was so angry they leaked out of me) for them to change their tone and realize we were coming from a place of confusion and absolute devastation.
In the end, we were left with nothing but brokenness. They told us they had to talk to some other department that oversaw the flood plain committee…sounds like they should have been in our meeting too. So we went into the weekend and waited.
One week later we received the email: “based on the grading plan, Floodplain Dept. can approve this layout…[as long as] a floodproof door is installed and approved in basement egress.”
PRAISE. THE. LORD.
We submit all the required fire hydrant contracts.
On October 18th, 2021 we recieved our permits.
Because this has been a recount of events over the last 10 months, I cannot even begin to replicate the rollercoaster of emotions that were felt. There was anger, then there was a glimmer of hope at progress, then heartbreak when we had to yet again add/change something else. I had lost the ability to be excited when we heard the good news because I felt like there was something bad that would follow. It seemed that every one of my and Harley’s phone conversations started with “do you want the good news or bad news first?”. But by the grace of God we made it. We get to build our home. I truly believe that God has big plans for us through this house because I can see His hand in every step of the way, guiding us through. He made us wait and now lumber prices are down. Crews are available to work. We are able to see the blessings in the waiting, and though this past year was tough, we are stronger in our faith and in our marriage because of it.
Even though I am a bit behind in disecting this on here, I want to always remain open and honest about our whole building process, and be able to shine a light on the “secrets” of building a custom home. If you would like to know more about the specs of our build, click here. If there isn’t a link yet, I’ll have it up soon! So here we go:
About two months ago, we were extremely excited to announce on our Instagram that we had submitted our building plans for permitting. This had been the second time we have submitted so we felt confident that we would be breaking ground very soon. .Unfortunately, this was not the case.
In case I haven’t mentioned it here before, we are within the city limits of Arlington, TX. We have learned that building codes are extremely strict, and I hate to say that we have hit red tape over and over again when dealing with the city. Problem one has been lack of communication from the city planners. I have a feeling that COVID has played a huge part in this problem, as I believe pre-pandemic you would schedule a in-person meeting with a city planner and disect your project requirements in person. Even though we have been in “contact” with the city since early November, we are constantly redirected to the website when asking direct and specific questions. . However, our inability to meet with anyone caused problems when we first submitted our plans in January, since the website was not specific about the submittal requirements for our specific lot.
It then took us 3 more months to gather all the required documents the city asked us to include in the permit application which I have listed below for those who are curious. While we had included a majority of the required documents, the missing ones had to be completed by several different parties, forcing us into a “hurry up and wait” game that continues to this day.
Site Plan
Floor Plan
Exterior Elevations
Door and Window Schedule
Wall/Wind Bracing Method
Energy Compliance
Engineered Fondation
Water Utilities Application
Park and Roadway Impact Fee
SWPPP
Fast forward to April 28th, and we were finally back in Permit Review. This time I thought we had checked all the boxes and crossed all our T’s. Our walls were engineered to withstand wind, our foundation and basement had been engineered perfectly, and we had all the other paperwork filled out. We combined all the files into one PDF file as requested, and submitted them into the online portal. We waited. For 5 days we checked back in routinely to watch the status of each requirement change from “pending” to “complete”. Until one day, everything stopped updating and we got an email from the lady who was coordinating our plan reviews.
She informed us our plans needed corrections. Seven pages of corrections…yes, you read that right…7 pages.
Some we saw coming, however originally we were told that we could apply for those portions later. Now they were telling us we needed everything upfront before they wou;d approve the project at all. So what was in these correction requirements?
Full extent of driveway shown and material indicated from public street
Missing an engineer stamp on our framing plans
Missing engineer letter for foundation plans (this was included…)
Energy Compliance review missed one back window specs
Manufacture information wanted on the polymer waterproofing for the basement
Need egress from the basement
Private fire hydrant plans needed and required to meet codes that include fire lane specifications OR sprinkler system plans
This actually was 3/7 pages outlining fire hydrant requirements and codes…I’m not going into all that…
Floorplan lay in a hypotheical easment that isn’t even approved offiically yet
Missing Grading Plan with drainage flow plan
Elevation certificate prior to inspection
Fire Marshall needs to approve fire hydrant plans
3 way contract provided for said fire hydrant required at permit application date.
Okie. So, that is the gist of our 7 page correction report that the lovely city of Arlington threw in our laps. Many of these issues could have been avoided had we been informed correctly of the actual application document requirements, so honeslty reading through the comments was extremely frustrating. As far as that fire hyrdant issue….so the story is that since the house will lay more than 150′ from the main road, we are required to install a private fire hydrant OR install sprinklers in the house. We originally were going to intall a fire hydrant, but then realized that the city is going to require 4″ ,12-foot-wide concrete as a fire lane all the way back to the house. Thats easily 400′ to the other side of the pond, and that amount of concrete definetly is not in the budget.
So, where are we now? We have opted to install a concealed sprinkler system instead of a hydrant since we are under the impression that this option does not require the “fire lane” of a driveway. We have made all the changes and are only waiting for a civil engineer to get us our plans back with drainage and required elevations. Again, it is a hurry up and wait game. We are hoping to be able to resubmit soon and break ground before the summer is over.
I do want to point out that while the past couple of months have been annoying, there have been some disguised blessings through all this, one of the biggest ones being that we are thankful to not have started digging our basement with all the rain that Texas has had recently. I don’t even want to think about how long all the water would have taken to dry out.
That’s all for now, but I hope to have another update soon.