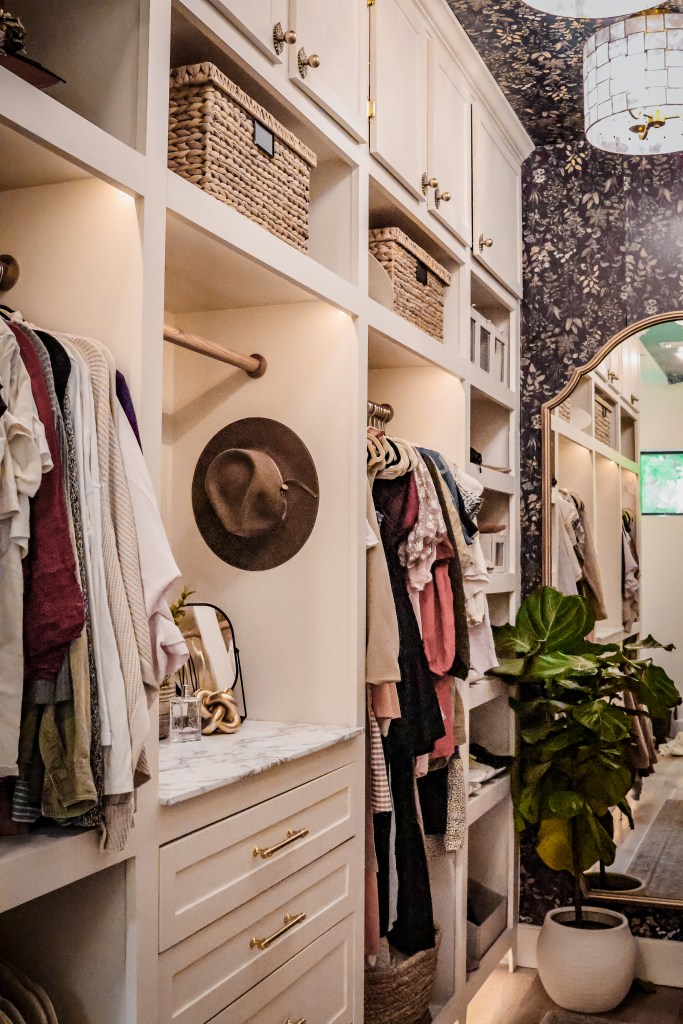
After 7 weeks of off-and-on work, my dream closet is DONE! There is something special about working hard for something and reaping the fruit of your labor, and this closet is no exception. Since we started planning our home build, I always knew I wanted to build out our primary closet myself. It’s a challenge I have been preparing for over the past couple of years of DIY projects, and every lesson learned has brought me closer to my closet.
This post is primarily for photos, so to pop on over to my Q&A blog please click HERE.
My first endeavor regarding cabinets and drawers was our barn workshop! Because I knew that the barn workshop was going to be a temporary fix to a long-term problem and that we would be moving our “workshop” to the garage after the build was complete, I took this as an opportunity to learn and grow my skills. (Drawers are still hard, but I did get better this time around). I applied a lot of the same concepts from that project to the closet project. (Click HERE to read how I build my cabinets).
I am in awe every time I walk into this closet. For me, there is so much sentimental value in this space because it marks the end of a stage of life for us. During our 2.5 year time in what we refer to as “the Limbo period”, we had limited space in our 700sq ft home. We lived out of boxes and bins, and things were never quite settled or put in place. I held onto things in storage because we never expected to be waiting for our Home for so long, and there was always an air of discomfort knowing our physical belongings were scattered. And then our little house flooded and that feeling was only amplified by the unknown timeline of moving forward.
But now, I go through boxes. I add items to the discard or donate pile. I hang my belongings and carefully fold them in the drawer. I am at peace. I am Home.
Click HERE to find all products I saved to my LTK.
Hello friends! The closet is done and after working part-time on it for the past 7 weeks I can’t tell you how elated I am to finally have a place to put our things! Honestly, between 2 vacations, hosting parties, having crews here for punch list items, being sick, and just plain old life, I don’t think 7 weeks is too bad given the fact that I can say I DID THAT! And, because my quotes started at $15,000 I saved myself a lot of money.
(note: $15k is reasonable for someone to charge for a closet this size. But because I have the time and ability to do it myself, I chose to go that route instead).
Of course, there were times when I had to ask for help-have you tried lifting or cutting a 3/4″ 4’x8′ sheet of plywood yourself? They can weigh up to 80lbs and yours truly is only 5′ tall. I am so grateful to have a husband who not only supports but highly encourages my DIY mindset. It takes a lot of patience to be married to a go-getter like me, and I cannot thank him enough for being willing to lend a hand or help problem-solve to figure out the best step forward. That’s just what partners do-they help each other.
I have compiled a list of FAQs because I think that is going to be the simplest way to answer the mass questions I have had pour in from a viral post on Instagram. (Some kind and inquisitive, others, not so much.) Of course, there will only be a handful willing to find and read this post-so thank you for being here! I absolutely love being able to share my experiences and lessons with you all, and t brings me joy to hear how I have encouraged you in your own projects!
All trim work was done with 1/2 premium pine boards.
How do you plan out your measurements?
I am not a professional and won’t claim to be. I don’t have any fancy software: I draw it out on graph paper and use painter’s tape to get the scale how I want it. It’s all backward math from there. If your wall is 11′ long, and I want 4 cabinets, divide 132″ by 4 to get 33″ wide cabinets. then subtract if you want any gapping or thicker trim. ALWAYS REMEMBER TO ACCOUNT FOR THE THICKNESS OF THE MATERIAL WHEN MAKING CUTS.
Do you have a tutorial?
While my closet highlight goes through a majority of the process, I followed a similar build style to that of my Barn Workshop Project. This was my first trial and error with cabinets/drawers and I have a lot of helpful information there. I will say that for this project, I used instead of MDF, I used all plywood for a stronger product result.
What kind of tools do you need for this project?
I would not recommend this for beginners, because you have to have straight and accurate cuts. Start with a smaller, singular cabinet or drawer base and then gauge if you are ready to take on a larger closet. There are also many DIYers who have upgraded IKEA PAX units with great success and those require less expertise if you are intimidated by building a whole cabinet.
Technically, you could do this with a circular saw, impact drill, Kreg jig, tape measure, level, square, stud finder, and a brad nailer. I recommend also having a table saw and a miter saw (or have your large cuts done at Lowes for $1/cut) to get the best cuts. Other useful tools to make life easier are clamps, a circular sander, a drawer jig, a dato and a hardware jig.
I did not pay for labor. Yes, my time is valuable but it is also my job to complete DIYs around my home and property and share them on social media platforms. I will disclose that we also have contractor discounts set up at multiple hardware and paint stores, which give us a slight discount on products. I did not have to buy any new tools for this project but above listed what I used.
Not included in this cost is what I gave our painters who were already here for construction punch list touch-ups to spray the cabinet bases. They work on a day-to-day- rate, so if you want to get technical add $500 for the 1/2 day they painted for me while I was out of town.
How much time?
I can’t give a full compilation of hours because I worked on this off and on for 7 weeks when I had the time.
Would you change anything?
Overall, I am happy with the results. Looking back, I would do a few things differently:
I would not caulk my drawer and cabinet faces. They look a little messy and I spent extra time trying to clean them up. Instead, I should have gone and bought some 1/4 solid wood to trim the faces with.
I think I am going to add a few more shelves to my shelving units for shoes.
Ultimately, I did not want my cabinet doors to overlap or to have a “floating style” but this resulted in an error of not measuring twice, cutting once. For time and sanity’s sake, I chose not to purchase more wood and redo them, maybe one day I will, but they’re good for now.
Every project is live and learn, and despite the errors that I made, I absolutely love what I built.
2023 Spring Antiques Show | Thursday, March 16 – Sunday, April 2 2023 Fall Antiques Show | Thursday, October 12 – Sunday, October 29 2024 Winter Antiques Show | Thursday, January 18 – Sunday, January 21
Hello, hello friends! I just returned from my second “big” Round Top, TX trip and I cannot wait to share with you all the details, and things I have learned about this two-week, bi-annual antique show. The last time I went, I scored a couple of large items, but because we had yet to finish building the house, I refrained from purchasing too many furniture items until this trip and budgeted for some “big ticket” items”.
It always helps to have a list of items you are looking for to keep from getting overwhelmed-there is A LOT to look at! Many vendors take card, but it always helps to bring cash and checks because the wifi networks the card readers work off of sometimes gets spotty.
Located under an hour and a half east of Austin, TX, the Round Top Antiques and Design show is a 2-week show, with shopping along TX HWY 237 between the towns of Round Top, Carmine, Warrenton, and Fayetteville, Texas. Along this 11-mile stretch of highway sit venues, barns, and fields filled with hundreds of vendors of all scales, ready to fulfill all your shopping desires.
Not all the vendors are open until later in the show dates, so before you visit, be sure to check out this website for more details if you have certain venues in mind. While the majority of sites are free, there are a select few that charge entry tickets or parking fees.
Click HERE for the 2023 show guide with comprehensive vendor, restaurant, and lodging lists,
Where to Stay?
Since the Antique Show is a large event with many visitors from all over the world, lodging tends to book quickly. You will not find a large hotel chain close by, with the largest town within an hour’s radius being Brenham, TX. Our number one choice is booking through Airbnb, VRBO, or similar local rental sites. These stays are precious and curated to the character that this area of Texas embodies.
Click HERE for a comprehensive list of local stays.
What to Eat?
We always bring snacks and a pack of water bottles with us while shopping, but this year I was surprised to see how many more food options were available while shopping in the fields. Each field and venue is set up differently, but many had food trucks, bars, and restaurants.
Brussel Sprouts at The Garden Co.Advocado Toast + Goat Cheese Toast + Matcha Latte at Casa Blanke
Some of our favorites in Round Top were:
The Garden Co (American and Cocktails)
Casa Blanke (smoothies)
Lulu’s (Italian)
Click HERE for a comprehensive list of restaurants around the area.
Shopping
Here is where the fun begins, and where each visitor is unique. Some vendors are open year-round (typically weekend operating hours), but the majority of the fun happens during show dates. Some smaller items will be firm on pricing but for larger furniture items you may be able to negotiate, especially if you are purchasing multiple items. If you’re wanting the best deals, go at the end of the show when vendors are more likely to lower prices to minimize having to repack their inventory.
Every location is a little different in terms of budget, activities, and set up so I will give you a summary of how we spent our 3 days of shopping.
Click HERE for a comprehensive guide of all vendors at the Spring show.
Day 1: Blue Hills
I love going to Blue Hills to start off the trip: 75+ dealers, and over 100,000 sq feet of carefully curated and beautiful shops filled with unique antiques, home decor, art, and more. Here you can purchase cocktails, coffee, and food from several vendors, and the bathrooms are always clean.
I like to start here to get ideas and ease into the weekend-I very rarely purchase large items from these vendors because prices will be higher here. Typically I will leave day one with a couple of smaller decor items unless there is a must-have piece. This is a great social venue as there are picnic tables set up around and the atmosphere is very relaxed.
We started day two in Round Top’s Downtown then moved south towards Warrenton, stopping at venues along the way. Prices here still vary, but personally, these shops still sit on the higher end of my budget.
Some highlights from day two of shopping are:
Fickle Farms White Barn (champagne vending machine)
The Compound
Market Hill
Day 3: Warrenton
Warrenton is my favorite, budget-wise. You are antiquing so naturally, some pieces will still be pricey, but I find a lot of larger items are much more reasonable. We tend to lose steam by the time we get to the fields here, but here is where I find the best treasures because sometimes you have to explore a little deeper. There are no permanent bathrooms here, only portapotties, and food choices are limited.
Our choice locations in Warrenton are the Excess I & II fields. Favorite vendors include:
Kock on Wood
Rengai Living
On our way back to our Airbnb, we also stopped at McLaren’s, which is a fun shop to walk through as the majority of the items are source form England!
My Finds and How I Style Them:
My favorite part of coming home is unwrapping everything and seeing all my treasures together! It’s an instant boost of serotonin to see everything cohesively work together. Every old piece has a story, and I’m thankful to be a small part of their journey.
In addition to the smaller, decorative pieces collected above, we also came home with a salvaged oak dining and coffee table! The dining table is 9’2″x 3’6″ and made (new) from salvaged oak in the Netherlands. There were several styles of this table all over Round Top, and style varied slightly with prices (for a 9′) ranging from $3800-$8,000.
While I don’t know the exact history of the coffee table, I adore the salvaged architectural legs and tall stature. It fits perfectly in our living room and I plan to add some large baskets underneath for blankets and other storage. After a bit of negotiating, we came home with this large, 6’x 4′ coffee table for under $1,200.
Not everything I purchased this weekend was old; we stopped by Magnolia Market in Waco on our way home where I purchased the large pottery vase and magnifying glass. I love how Johanna Gaines’s newer product lines mimic old antique pieces.
I also found some newer glassware in Round Top home decor-centered shops, so the Round Top Antique Show truly has something for all types of shoppers! You do not have to have a design business, or a large budget, to enjoy a weekend exploring Round Top! You don’t even HAVE to buy anything to enjoy going; sometimes it’s fun to simply be with friends, and explore the treasures that antiquing brings to light.
It’s no secret that I love giving an antique salvage piece a new life in my home. I don’t know what it is about old things, but I am constantly drawn to their history and stories. Even though my house is brand new, I wanted it to feel like pieces had been here for centuries. That’s why I constantly look for salvaged architectural details such as bricks, tiles, doors, and even furniture pieces. Even if it’s new, I want it to look old. (Check out our exterior cladding HERE. It screams old-world design to me.)
Here are the gorgeous European Quarry tiles that were sourced by my friend Kaci at East End Salvage. We used them in our walk-in pantry and they perfectly replicate the old-world feel I want in every space of our home.
But Lanna, where do you find all these pieces? Where do I look to find some myself? Friend, let’s dive in.
Antique/Salvage Vendors
Some of my favorite pieces have been sourced by people who find salvage for a living! I have met so many great vendors at Round Top Antique Show (see last year’s finds HERE) and through local contacts. Here’s a list of some of my favorites!
East End Salvage
Benny Jack Antiques
Stone Farm Living
Knock On Wood Antiques
The Old Grainery
Facebook Marketplace
Facebook can be a tricky one to train toward your liking. My biggest tip here is to go in and search for items you like, even if you aren’t going to buy them yet. Search “bricks”, “tiles” “antique” and “architectural salvage”. Scroll and find similar items to what you are looking for and then save them-even if you won’t return to them. This will help train your Facebook algorithm to automatically pull up items you are interested in.
Local Salvage/Surplus Stores
Habitat for Humanity has great items, and while they may not actually be old, a lot of times you can find tiles that will fit right in.
Search for salvage yards in your area and give them a shot-usually these are a trial and error but you never know when you’ll find a gem.
Garage/Estate sales.
Estate sales are superior
Online
If you’re looking for antique furniture check out these below. There are usually items in all budget ranges.
1st Dibs
Chairish
Etsy
The bricks in my laundry and mud room originally came from two separate textile mills in Massachusetts. They were sourced from Stone Farm LLC and sliced into thin pavers.
You’ll find thrill in the hunt. I remember growing up, I would always get super embarrassed by my mother slowing down when she saw large piles of thrown-out renovation trash. And I cringed as she would recruit me to load up an item pulled from what I saw as the garbage. But every item she pulled was turned into something beautiful down the line. I guess what they say about one’s trash is another’s treasure really is true.
Seeking out salvaged items is often a jog, not a sprint. So start looking in advance of when you will need something! I had my old windows for my greenhouse sitting in storage for years before I finally put them to use. So if you are able, plan ahead.
Photos by EMPhotograpy of the greenhouse before I changed the back wall last spring.
Salvage does not HAVE to be expensive to look nice. Almost every structural piece of my greenhouse I found either on Facebook Marketplace or sitting in an old barn on the property. Even the lockers and birdcage chandelier came from an estate sale. You have to be patient and always have your eye out for those cool pieces.
I like to start out every space I design with a mood and design board. This gives me the opportunity to “test” out products before I commit to purchasing them and allows me to play around with different design elements in a space. Plus, they’re fun!
When designing the guest bedroom, I wanted to create a home-away-from-home feel for our company, while staying true to my design style or warm and cozy. I grounded my design off this beautiful artwork I purchased From Laurel-Dawn Corner Studio and a gifted rug from Loloi Rugs. I love how the colors in each piece radiate warmth and comfort and give the room an elevated feel!
I still have several more items to add, but all good things come with time! Click HERE to read my tips about creating an inviting bedroom space.
As the holiday season comes to a close and the guests all make their way home, I’m sure the last thing on your mind is entertaining and hosting overnight company. Trust me, I am probably one of the last people who is thinking about wanting more people in her home right now. In a span of 14 days, we hosted out-of-town family and friends for a total of three different Christmas gatherings and two New Years’ Eve parties-oh-and closed and moved into our custom new home.
*Alexa, play Crazy by Patsy Cline*
Despite my need for retreating back under my rock, I think now is the perfect time to start thinking ahead for the next overnight event. But I am not talking about meal planning or buying presents: I am talking about creating a warm and inviting place for your guests to retreat to in the evening.
I love my people. And I always want them to find my home as a reflection of comfort and ease. A welcome place where they can let their guard down, their children can run free, and they can find restful sleep after a day of fun. That’s why I put so much thought into creating spaces they can enjoy as well.
Like most of my home, I treat styling my guest bedroom as a jog, not a sprint. Cozy places often take time to curate-it’s okay if everything isn’t perfect on day one!
Here are some tips for styling a great guest (or main) bedroom where the retreat is welcome:
1. Start with neutral base pieces that anchor the room, but can adapt to many color palettes and styles
I like to start with the most important aspect of a bedroom: the bed!
Finding bed separates are key in making a space flexible and interchangeable over time, so opt for a platform bed frame in black, white, or wood tones and a headboard that can either be mounted to the wall or attached to your bed frame.
2. Pick a color palette and style that reflects your home
After all, your guest bedroom is inside YOUR home. YOU have to also love it and while you design it with your guests in mind, your guests will love seeing a reflection of your style.
Does choosing colors make you nervous? Don’t stress: an easy trick is to anchor your colors off a piece of art, or a rug you like. Then it will all be tied together.
3. Choose quality bedding and linens
Whether you are a white bedding fanatic like me or opt for colored linens, pick a quality thread count and nice pillows. Bedding can set a room apart and makes or breaks the whole “overnight” experience.
If you really want to get fancy, use lots of layers! Sheets, duvets, quilts, throw blankets, and pillows all make an ordinary bedroom feel like a luxurious hotel getaway.
4. Add room-darkening curtains
Sleeping in or needing to put a little down for a midday nap? Buy the room darkening curtains.
My favorite curtains are these from TWOPAGES. The price for quality is unmatched, and you can customize them!
5. Ambiance lighting
Lamps, Sconces, Pendants.
However, you choose to do it, add in calming ambiance lighting. We joke here about why we even installed overhead lighting because I use it so infrequently.
6. Take your time adding accent pieces
Accent pieces elevate a room, but are not necessary. I love to hunt for functional accent pieces like chairs, benches, wardrobes, and side tables at antique stores to add a mix of old-world charm, but you can find these pieces wherever you shop! These pieces are where your style can really shine-so don’t worry about needing to rush!
Creating these spaces is supposed to be FUN! So this is your permission to take your time and find those things you love. It doesn’t have to happen overnight, or even be perfect according to a textbook: this is your home, make it what you love. I always like to design virtual mood boards to help me make those tricky design choices that come with shopping online. That way you can be sure you love how an item looks in the space before committing to purchasing.
To see more of my evolving, work-in-progress, guest space or to shop my guest bedroom: Click HERE.
I like to ground a bedroom with neutral, versatile pieces that can evolve with your style over time. Below are some beautiful rooms that I absolutely love the bed selection for:
Lone Fox Home, The Roosting PLace, McGee & Co
I’ve picked out a few favorites to help you build your cozy transitional bedroom without breaking the bank:
In some ways, I am thankful that our home has taken 2.5 years to come to fruition. I have learned a lot about myself in the past couple of years, specifically, I have really come into my own design style. I am no longer afraid to branch out and try some unorthodox (for past Lanna) methods. I am not afraid to do things differently than the trends are highlighting.
This being said: I originally envisioned living in a white-painted brick home. When we were working with our architect, almost every inspiration photo I sent her was white brick, with wooden accents, and a black roof. I was convinced that I needed a crisp, white modern farmhouse that looked like all those beautiful ones I have admired in magazines and on Pinterest. Until I saw one in person. Then another. And another. I was a little blinded by the number of white brick homes I began to see everywhere. They felt like copy-and-paste versions of a trend that will fade in a couple of years and then what happens when everyone wants natural red brick again?
Don’t get me wrong here: if you love white-painted brick exteriors, that is amazing, and I encourage you to explore that with your own home if that is what you wish. I still think they are beautiful. But, for me, seeing the same white brick all over every home made me want to do something…different.
So I started thinking about what I wanted our home to be for us. I want to come home every day and feel in awe that I am blessed to live here.
So I started thinking about what I wanted our home to be for us.
Enchanted, Dazzled, Delight…Captivated. Captivated and embraced by the feelings that home encompasses. Many of these feelings have been stirred ironically when I have been furthest from home and exploring places around the world. I have been captivated by European buildings that have stood for hundreds of years, wearing every scar and wrinkle with pride. I have been delighted as I have walked through old downtown shops full of stories. Oh-if buildings could speak, what would they say?
At first, I didn’t know how to achieve this feeling on the exterior of my home, but I knew I wanted every aspect of my home to reflect those feelings of enchantment that have brought me tranquility down to my core. I wanted to blend that old-world feel of comfort with modern design. So I began searching. I needed to keep a rock/brick design element because our foundation had already been poured with brick ledges. I immediately thought of Austin stone to give me texture, but too much yellow reflection in the sunlight. So my search refined slowly from white homes to gray stone.
And then I found Horizon Stone, a company out of Chattanooga, TN that manufactures thin stone veneer (it’s actually made of cement and coated to look like beautiful stone!)
When I clicked on their site and started exploring more I read: “…blending the best of old-world stone structures and modern technology, we affordably offer the timeless look of stone with the modern convenience of custom manufacturing.” There it was. Old world. Modern. A perfect match in my books. And affordable?? I order a sample of their 19th Century Stone in Hermitage.
I also ordered some other stone veneer samples to compare because I was nervous this product would surely not live up to its more affordable cost (from the stone yard we purchased from it was $6.50/sq ft, and this was comparable to what we would have paid to have brick installed, then painted!) Let me tell you, none of the other stone veneers I ordered could hold a flame to the color and texture that was on the Horizon Stone sample board.
So we ordered it.
The delivery sat on our job site for 6 months before we finally got to the stage where our masons could install it. But let me tell you that when they were able to install I felt like a kid on Christmas morning. Enchanted, Dazzled, Delighted, Captivated. And the masons even took the time to teach and show me how to lay the patterns and install the stone veneer myself, so while they definitely did 98% of the work, I can feel proud knowing that I had a hand in laying the stone of our forever home.
What’s even more exciting is the fact that we ordered too much stone! So we were able to also install it on our retaining wall, and even have enough to face the fronts of some add-ons we have planned down the road (Like a new barn and a workshop!) I cannot wait to continue to use this stone veneer as a way to tie our property together and to feel like we have brought a piece of history here, all while making our own.
FAQ’s
What is the difference between manufactured and natural stone?
Natural stone is made by nature and is quarried and cut into various shapes for different uses. Manufactured stone (also known as a stone veneer or cultured stone) is made of a cement mixture that is poured into molds and colored to look like real stone.
How much per sq ft did your exterior cost?
Prices may vary depending on the stone yard, your location, and cost inflation-but when we purchased ours it was $6.50 per sq ft.
Yes! We have several additional structures planned (a workshop and a new barn) for our little homestead and I plan to use this stone veneer to tie all the buildings together!
I cannot wait to show you all more photos of our exterior as we get landscaping finalized! It’s going to be good. You can always stay up to date with the most recent updates on my Instagram: @TheRoostingPlace
While our future home is still well under construction, I recently shared on Instagram the design board for our mudroom and decided to share links to all the pieces that have inspired this room in our home!
I have to first include some honorable mentions that inspired my mudroom design: (you can find these and more on my Pinterest)
Hammers N HugsMonica HibbsKatarina Brucks
I love how all these spaces meld together with warm tones to give the most inviting spaces!
Click through below to find my sources! I’m super happy to have found most of my tiles at local discount stores over the past year and all that saving allowed me to buy the brass fixture of my dog wash dreams!
My thin brick pavers are coming from Stone Farm Living and I cannot wait to install these Reclaimed Chicago Bricks in my home! Stay tuned for more details because I will be able to get my hands on this space very soon!
“Cozy, comforting, connected”. That’s how I envision my dream bathroom. We have lived in our share of homes and visited our share of bathrooms, and the ones I fall in love with are the ones where I feel like I can truly breathe and relax ( of course also the ones with a large soaking tub). Personally, I don’t like a ton of bright whites or cold marble tones, not in my bathroom. I understand the draw to white bathrooms, I really do. They can feel clean and happy. But for me, I need my bathroom to be a true reflection of nature, with wood tones, warm stone, and earthy elements; so if that is you too, welcome.
I am inspired by dramatic metals paired with wood graining. Something about a sauna enclosed with wood makes my heart happy, and I wanted to incorporate that feeling into our home.
Our bathroom is composed of several “sections”: vanities, wet room, and toilet closet (in addition to my personal vanity that is not included in these design boards). There are several directions this space could head, depending on how the room feels once we have reached that stage in construction.
But for now, let us explore the possibilities, together.
As always, you can see more updates on my Instagram: @theroostingplace
Vanity
I was hesitant about the window between the vanities at first, but it has grown on me as this will allow for natural light to filter in through our shade, reducing the need to turn on the overhead lighting. I love how wood planking and beams will draw the eye upwards and give a natural feel to the space. It then comes down to design elements.
I am breaking up these designs into Option 1: light flooring, and Option 2: dark flooring. I am attracted to both ideas, but it will ultimately depend on the space.
Option 1: Light Flooring
1.a dramatic dark vanities and a lighter moody green wall1.b brighter tones and natural wood vanities1.c natural vanities with a moody green wall
Option 2: Dark Flooring
2.a bright wall2.b moody green wall
As you can see, each option can be turned in different directions, all being beautiful in their own unique way.
Wet Room
“A wet room is a fully water-tight bathroom with no separate shower tray. The “walk-in” shower area is usually level with the surrounding floor but with a slight slope to the drain which is fitted directly into the floor…a wet room typically contains a shower and a tub.”
Our wetroom will be equipped with a steam shower, two shower heads, and a soaking bathtub. The back wall behind the tub will be an antique tile and accented by a chandelier (most likely a candle holder to avoid any electricity risks of a steam room, and honestly the idea of a candle-lit soak makes me giddy).
The design of this space also depends on our flooring choice, as we will incorporate the same tile into the wetroom.
I personally love both looks alongside the brass details.
Toilet Closet
Just your average toilet closet, but make it fancy. I’ve included boards that showcase both flooring options.
I am extremely excited to work on bringing this relaxing space to life, and can only hope that this is a space of true relaxation for decades to come.
What’s your favorite: dark or light flooring?
Talk soon and God Bless.
xx, Lanna
p.s. (If you see something you like and would like more information on any items/elements in these boards, you can purchase my link sheets below:
Relaxing Natural Bathroom: Dark Tile Floor Edition
These link sheets are complete with active links to all elements and design suggestions in the images above for you to peruse and buy at your own pace! Happy Shopping!