
Hello friends! The closet is done and after working part-time on it for the past 7 weeks I can’t tell you how elated I am to finally have a place to put our things! Honestly, between 2 vacations, hosting parties, having crews here for punch list items, being sick, and just plain old life, I don’t think 7 weeks is too bad given the fact that I can say I DID THAT! And, because my quotes started at $15,000 I saved myself a lot of money.
(note: $15k is reasonable for someone to charge for a closet this size. But because I have the time and ability to do it myself, I chose to go that route instead).
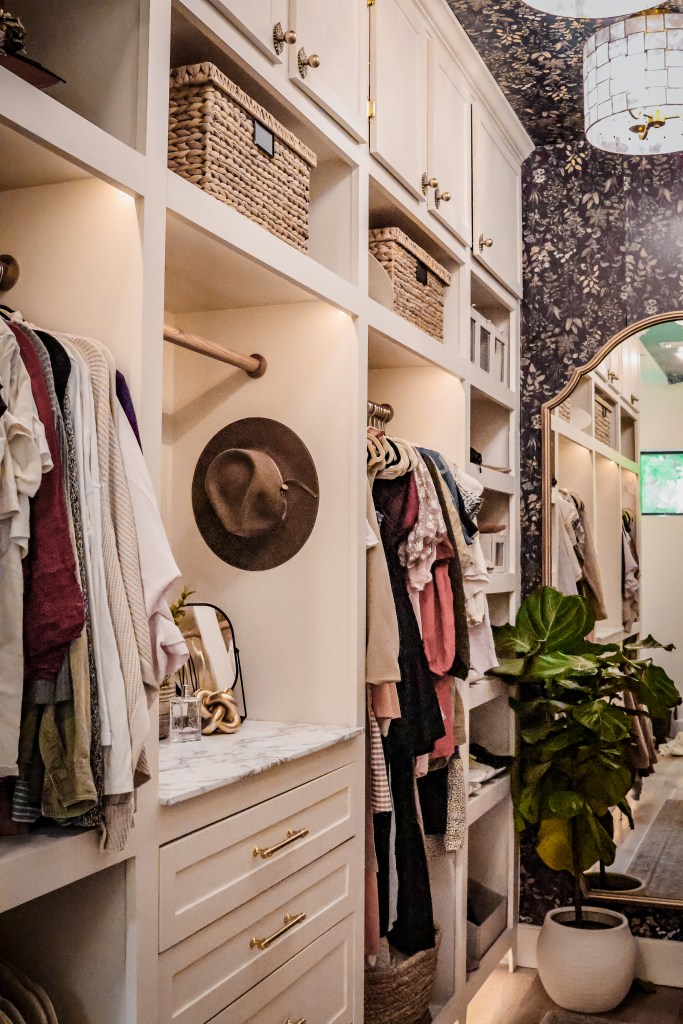


To see more photos of the closet, click HERE.
Of course, there were times when I had to ask for help-have you tried lifting or cutting a 3/4″ 4’x8′ sheet of plywood yourself? They can weigh up to 80lbs and yours truly is only 5′ tall. I am so grateful to have a husband who not only supports but highly encourages my DIY mindset. It takes a lot of patience to be married to a go-getter like me, and I cannot thank him enough for being willing to lend a hand or help problem-solve to figure out the best step forward. That’s just what partners do-they help each other.
For closet links click HERE.
I have compiled a list of FAQs because I think that is going to be the simplest way to answer the mass questions I have had pour in from a viral post on Instagram. (Some kind and inquisitive, others, not so much.) Of course, there will only be a handful willing to find and read this post-so thank you for being here! I absolutely love being able to share my experiences and lessons with you all, and t brings me joy to hear how I have encouraged you in your own projects!
For more updates, follow me on Instagram: @theroostingplace
So let’s get to it!
What are your room dimensions?
This closet before build-out is 11′ x 7′ with 10′ tall ceilings
How deep are your cabinets?
My cabinet bases are 19 5/16″ deep with a 4″ toe kick. This allows for the lights to lay underneath and my hangers to fit fully inside.
What thickness of material did you use?
I used 3/4″ whitewood plywood for the cabinet bases and shelves, 1/2″ whitewood plywood for the drawer sides, and 1/4″ plywood for the drawer bases.
All trim work was done with 1/2 premium pine boards.
How do you plan out your measurements?
I am not a professional and won’t claim to be. I don’t have any fancy software: I draw it out on graph paper and use painter’s tape to get the scale how I want it. It’s all backward math from there. If your wall is 11′ long, and I want 4 cabinets, divide 132″ by 4 to get 33″ wide cabinets. then subtract if you want any gapping or thicker trim. ALWAYS REMEMBER TO ACCOUNT FOR THE THICKNESS OF THE MATERIAL WHEN MAKING CUTS.
Do you have a tutorial?
While my closet highlight goes through a majority of the process, I followed a similar build style to that of my Barn Workshop Project. This was my first trial and error with cabinets/drawers and I have a lot of helpful information there. I will say that for this project, I used instead of MDF, I used all plywood for a stronger product result.
What kind of tools do you need for this project?
I would not recommend this for beginners, because you have to have straight and accurate cuts. Start with a smaller, singular cabinet or drawer base and then gauge if you are ready to take on a larger closet. There are also many DIYers who have upgraded IKEA PAX units with great success and those require less expertise if you are intimidated by building a whole cabinet.
Technically, you could do this with a circular saw, impact drill, Kreg jig, tape measure, level, square, stud finder, and a brad nailer. I recommend also having a table saw and a miter saw (or have your large cuts done at Lowes for $1/cut) to get the best cuts. Other useful tools to make life easier are clamps, a circular sander, a drawer jig, a dato and a hardware jig.
For a compilation of beginner tools click HERE:
How much did this project cost me?
I did not pay for labor. Yes, my time is valuable but it is also my job to complete DIYs around my home and property and share them on social media platforms. I will disclose that we also have contractor discounts set up at multiple hardware and paint stores, which give us a slight discount on products. I did not have to buy any new tools for this project but above listed what I used.
Plywood, Trim, Beadboard, Edge Banding: $1650
Paint and primer: $200
Accents (wallpaper, rug, mirror, brass hardware & hinges, LED Light strips, contact paper): $1,765
Drawer slides and pant racks: $380
Misc screws, nails, tape, glue, etc.: $200
TOTAL: $4,185
Not included in this cost is what I gave our painters who were already here for construction punch list touch-ups to spray the cabinet bases. They work on a day-to-day- rate, so if you want to get technical add $500 for the 1/2 day they painted for me while I was out of town.
How much time?
I can’t give a full compilation of hours because I worked on this off and on for 7 weeks when I had the time.
Would you change anything?
Overall, I am happy with the results. Looking back, I would do a few things differently:
- I would not caulk my drawer and cabinet faces. They look a little messy and I spent extra time trying to clean them up. Instead, I should have gone and bought some 1/4 solid wood to trim the faces with.
- I think I am going to add a few more shelves to my shelving units for shoes.
- Ultimately, I did not want my cabinet doors to overlap or to have a “floating style” but this resulted in an error of not measuring twice, cutting once. For time and sanity’s sake, I chose not to purchase more wood and redo them, maybe one day I will, but they’re good for now.


Every project is live and learn, and despite the errors that I made, I absolutely love what I built.
Talk soon.
xx, Lanna