Storing Christmas: Avoid the Headache

If you are like me, Christmas is the perfect excuse to go all out in decorations! I love the festive and cozy feel that the twinkling lights and glowing fire add to a home during this time of year. What I don’t love, packing it all up. Last year, I made an effort to “organize” my decor, but since I tend to buy most of my decor year-round, most of it never made it into a bin.

The situation was made worse when we moved into our smaller home, and I didn’t have room for most of my decor, causing me to pick and pull at random, then to shove unused items back into random bins. I told myself that I would “deal with the issue later”…let me tell you, future me has a few choice words for past me. So this year, I decided I had enough of the Christmas storage blues: I reorganized EVERYTHING.

While there are many different ways to organize your decor, it is important to first ask yourself: what will make my life easier and be managable to keep up?

Talk about a visual overload

While there are many different ways to organize your decor, it is important to first ask yourself: what will make my life easier and be managable to keep up? And remember YOU ARE NOT ALONE. I’m pretty sure even the most organized people still have to step back and rethink their system every couple of years!

Photo taken from Lowes.com

For me, I started by pulling everything out of their bins, and laying it all out in front of me. This helped to visualize and group like items, and to come up with a game plan for putting everything back up.

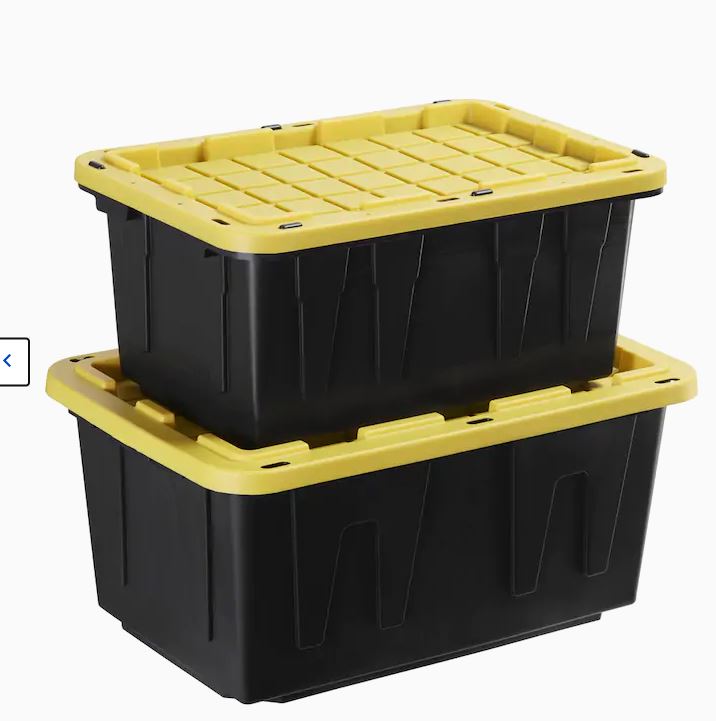
Now I get to tell you about the PERFECT storage bins/totes/bucket (whatever you choose to call them) that I use without blinking an eye: The Commander XXL (27 gal.) This brand can be bought at your local Lowes, and have several sizes to choose from. I go with the XXL because I have found they hold an ideal amount of things, without running into the problem of being too heavy to lift. This point is even more crucial if you ever find yourself lugging your decorations up any form of stairs or ladders.

This brand is sturdy, heavy duty, and stack perfectly on top of one another! They have an awesome design feature that allows you to zip tie the lid shut, giving an excellent seal against any crazy moves, or unwanted critters. Fun fact: we moved a good bit of our house via these totes!

Now that I have all my totes empty and ready to go- it is time to start organizing! Here is a breakdown of how I sorted everything out in each bin:

  • Ornament bulbs (2 bins)
    • I color code my ormanent balls (most are shatterproof) into bags so they are easy to grab for the next year
    • I also add in tree toppers to this bin, mainly because I don’t have that many and they fill in weird spaces
    • Ribbon and bead garland are also in these bins, they fit in the weird spaces well!
  • Special ornaments
    • Each year since childhood, I woul always pick out a “special ornament” that represented a milestone or memory that represented that year. My mom then had me take them with me when I moved out and had my own tree so that my new tree would never be empty. This is one of my favorite traditions, so we have added in Harley’s childhood ornaments, and continue to add to our collection every year!
    • These ornaments are wrapped more securely, and padded in their own bin labeled FRAGILE
  • Lights
    • All lights, indoor and out fit into one bucket this year, I may need another one for next year
  • Themed Decor
    • I decorate the outside of my house in “gingerbread” and “peppermint” theme, and I have collected several items over the years that these decorations now require their own bucket. It makes it easier to place large collection items in thier own bin, and makes it easy to access the following year
  • Nativity and small signs
    • While some signs are larger and require being stored out of bins, smaller signs/banners are stored together
  • Winter greenery (2 bins)
    • This bin has all my greenery sprigs and loose stems. Labeling this bin as winter allows me to access the greenery year round, and I am sure I will break into this bin again soon as I put up my winter decor.
  • Kitchen dishes
  • Linens
    • pillows, pillow covers, throw blankets, towels, aprons, tree skirts, stockings, you name it-if its made of fabric, it goes in here
  • Houses/Bottle brush trees
    • I bought these really cute box houses this year after christmas, along with a couple of other clunky decorations, so I placed them in a bin together and filled in gaps with small trees and bottle brush trees. Be careful not to smoosh your bottle brush trees if you have them, they don’t bounce back well.
  • Lighted Ceramic Houses
Photo from Lowes.com

All of my greenery basics (trees, garland, wreath forms) go into large canvas bags. I have found these bags to give the least amount of headache, and allow for several pieces to be stored in one place without shoving and smooshing your greenery too much. Most of these bags also have wheels, which helps when moving the bags around! For any other big wreathes that I consider my “pretty wreathes” (basically any wreath that I bought and that I don’t add my own greenery to) canvas wreath bags are a life saver! I also hang some of my wreathes on nails in our barn loft, but if you don’t have space to do this, the wreath bags are the next best thing.

That’s basically it! We did buy a 12 foot tree in preperation for next year in the big house (fingers crossed), so that will stay in its’ original box until we break it open next year. After that, we will buy more canvas bags (the man selling us our tree said it will take 2!) and store it that way. I also want to invest in a label maker and label all my bins in a nice asthetic way, but for now, painter’s tape and sharpie work great!

Important takeaways for packing decor:

  • Wrap your breakable or important decor WELL
  • Place more “durable” items at the bottom of the bin, fragile on top
  • Don’t overpack your totes/make them too heavy
  • Use linens to wrap your breakables and save a tote
  • Store like items together
  • Label your bins! Doesn’t matter if they look pretty, you will thank yourself later
  • Clean out as you go! Don’t hold onto items you don’t use anymore!
  • Try not to smoosh decorations, get another bin if needed.

At the end of the day, remember to organize in a way that makes the most sense to YOU! Some people prefer to store decor all by room, by theme, by tree! For me, I like to have all my pieces seperated and ready to create something new in the next year, totally up to you!

Talk soon,

xx, Lanna


Another hello: our love story (pt. I)

Since starting this blog, I will be honest, I have felt a little overwhelmed! I have so many ideas that swirl around in my head at all times, and trying to get them all into words is sometimes a problem for me because there are so many things I would love to tell/show y’all! So I figured first I should dive into a little more about who we are, and let you get to know me (us) a little more. Our story is a huge part of where we are today, so I wanted to spend a couple blog posts diving into to the life of the Davis flock.

Our 1 year wedding aniversary

This man. Y’all, I love him, but I didn’t always, so let’s explore that. We grew up in a small, growing but small, town. Both of us had lived there pretty much our whole lives (maybe I’ll expand on my childhood more later, but for now just know we grew up in the same small town). I had attended one small baptist church since I was 3 years old, and we went so regularly I considered it my second home. One summer morning, we were loading up to head to youth group, and there was this new shaggy, wavy blonde haired guy in the mix I had never seen before: Harley. And y’all this was NOT love at first site.

Harley will be the first to tell you that he was cocky, loud, and gave off that “entitled” vibe, but the main caveat: he is 4 years older than me. And he was coming to church camp with us-oh, Lordy, bless this mess. First night of church camp (we stayed in a cabin that had a boys dorm, a girls dorm, and a common kitchen and living space) this boy runs out into the kitchen in NOTHING BUT A TOWEL. My little heart almost died-THE EMBARRASMENT. He never followed the rules, was always pulling pranks with the other guys, and was a little show-offy, so for my goodie two shoes self, there was no place in my world for his “kind”. ..but I will admit he has always been cute.

I laugh about it now, because he stuck around. That year at church camp, he accepted Christ, and he continued to show up every week after camp where we had the typical “you’re in my youth group so I tolerate your company” relationship-Up until the following summer, when we were put on the VBS recreation team together. For my non church people, this is basically the team in charge of running kids around with “bible-based” sports games that typically end in everyone being soaked in water because it’s Texas summer and teenagers in charge of kiddos. This summer changed everything. We became…dare I say it… friends. I learned this guy had the biggest heart, and a soul that ached for the well being of others. He is talented, kind, cute, and…still 4 years older than me.

These guys were basically inseperable.

This thought always rang in my head. I was 15, and was not chased by guys at school, and I had a older guy friend. It was fun to toy with the idea, but deep down, I always told myself no, because… 4 YEARS OLDER. So we stayed friends. I honestly don’t even know when he started to have feelings for me (maybe I’ll ask him), but I can assure you it was definitely after me. I even watched him go through a relationship with another girl, trying to encourage him when it wasn’t working out, that sucked.

It also turns out that we were neighbors and only lived a block away from each other. *CREEPER ALERT* I would climb on my roof just to look at his house and see if he was home…I know…I know…anyways. Moving forward to the fall, I remember trying to impress this cute older guy by trying to convince him that I was a great kisser (I had NEVER even gotten close to kissing a boy) and worked it out to sneak out to meet him in his backyard that night to “show off my skills”. (OMG this is embarrassing). He somehow agreed and it was very obvious that I DID NOT know what even the slightest I was doing. But y’all, he’s so sweet and didn’t even bat an eye, probably because he totally knew my ploy from the get go.

Needless to say, we did end up sharing a kiss, which was the sweetest little moment ever under the October stars. We began to make our secret little “dates” a regualr affair, and as you can imagine this could not end well…

Since this post has gotten long I will share the rest of our rollercoaster ride with you next time.

Talk soon,

xx, Lanna


Building a Murphy Bed + Shelves

Hello! Last time we talked, we had loaded up the murphy bed frame and hauled it home until installation day… WELL INTALL DAY HAS ARRIVED Y’ALL (oh yes, I am a Texan through and through). If you’re just now joining us, check out Murphy Bed Pt. I , but if you’re all caught up, let’s just jump right in, shall we? I apologize for some lack of photos, I will try to explain the best I can without them!

Materials Used (shelves):

-3 sheets 3/4″ plywood

Yaaaaay shadows! Here is the painted plywood that be the base for the mattress .

-1 sheet 1/4″ plywood OR 1 sheet 1/8 hard board for backing

-nail gun

-kreg jig

-kreg jig screws

Day 2

. . .

Today we had to start bright and early, because yours truly put off painting all the wood…mainly due to cold weather conditions, but laziness was also responsble. The color of choice: Chantilly Lace by Benjamin Moore, paint matched at Sherwin Williams (because we personally like the quality of paint more). After rough sanding all our wood, a step I personally should have spent more time on to avoid roughness, we used our handy dandy Graco paint sprayer to prime all our wood pieces. ***IMPORTANT: always prime your wood***. I have a fun finishing touch in mind for the front of the murphy bed, but if you plan to leave this part as is, make sure to SAND SAND SAND to get a smooth finish.

Shelving unit prior to trim piece additions.

Once the primer was done, two coats of my beautiful Chantilly Lace white were sprayed on. I could write a whole post over my love for Chantilly Lace and how I think it is the perfect shade of interior white, but this post is about the murphy bed and not the fifty shades of white. Continuing on…

Using a nail gun to attacht shelving trim.

Now that all the pieces were sprayed and dry, it was time to begin assembling the shelving units. We have 8 ft ceilings, so these 2 units are each 94″ tall and 22″ wide to leave room for manipulation once inside the room. We are adding crown molding pieces later, so the gap between the shelf and ceiling will eventually be covered up. We started by using our trusty friend, the Kreg jig, and made pocket holes in each of the shelves, then attached the shelves one by one to each side, leveling as we went until all the shelves were in place. We also added a front trim piece to the bottom of the shelf to give an even look. The back panel was then attatched using a nail gun.

While the guys worked on building the next shelf unit, as well as the mattress frame (still using the plans purchased from DIY Tyler, I used the nail gun to attatch the front trim pieces. This gives the shelves a more finished look, and hide the rough, ugly plywood edge. Another option would be to edge band the sides, but adding a trim piece made these look a little more “professional”. Once the trim is attached, fill in the holes using a wood filler, sand down to even the surface, and paint.

Once the shelves were assembled, sanded, all trim was attached and painted, it was time to move them inside! I don’t have any photo evidence of these being moved in, but let me warn you: this is a two man job! Your shelving units and frame will be heavy, and a little difficult to manuver alone. Prior to fitting the shelving units and frame into their final resting place, use a stud finder and mark wall studs to secure your bed to, we don’t want this to fall on anyone! Once we found our studs and the shelves are in place, we used a jig saw to cut out holes for our electricity outlets, and reattached the outlet cover on the inner side of the shelf to give a seamless and built-in look. The shelving units were then attached to the frame (from the inside of the frame to avoid seeing screws on the shelving units) and the whole unit was secured to the wall via screws using pre-marked stud locations.

Lastly, the mattress frame needed to be attatched to the wall frame. This step provided some trouble for us, and I will reccomend how to avoid the complication we faced in a little bit, so hang in there! The swivel bracket we used requires various bolts and screws to attach, and we ran into complications trying to attach one side, then not being able to get access to attatch the other side. ***face palm*** We actually ended up having to UNATTATCH our shelves and wall frame (start over) to get better angles to our swivel bracket and to avoid making holes visable through our shelves. Again, I apologize for the lack of photo evidence throughout this last part of the process. We honestly had to do a lot of problem solving, adjusting, and a little bit of rigging. My best advice: watch the DIY Tyler youtube video on tricks to get your bolts in little bitty places where fingers will not go no matter how ahrd you try! (He starts to talk about the swivel bracket around 9:00).

Murphy bed down without mattress
Murphy bed down with mattress

After lots of sweat (maybe a little blood and tears in there too) we got the whole bed put together and secured to the wall! Let me tell you this thing is worth it! Definitely watch all of the youtube before starting, we did not and faced some complications in the process, as you read above. The last step requires putting the mattress frame in its upright (stowed) position, and making holes through the shelfing unit through the mattress frame to insert the pins which will keep the bed safely upright. We used a 1/2″ drill bit, and then used a 2 1/2″ hitch pin to secure the bed in its upright postion.

There you have it! Was I clear as mud? Honestly, this is so worth it and I’m not even finished yet! Next up for our leading lady? Decoupage and a fun wood design that will knock your socks off!

Talk soon.

Xx, Lanna


Easy peasy tricks to spice up your faux garlands

Hello! I’m here today to give you some fast (and simple) tips on how to bring your Christmas garlands to life! I don’t know about you, but I adore those beautiful faux garlands that look like they just came fresh off the tree! However, my wallet does not. So, instead I improvise, because I LOVE having garland hanging around at Christmas time.

Basic 9′ prelit garland

Materials:

-pre lit faux pine garland (if you don’t have prelit garland, you will need to wrap your lights prior to adding greenery)

-assorted greenery of choice

-ribbons (optional)

-berries (optional)

-pinecones (optional)

To start, I use a basic prelit 9 ft faux pine garland. I can usally find these for about $25 and get a pretty full, dense garland that will last me years! One of the perks of faux garland is it’s ability to be smooshed down and stored to be resused again and agian. However, if you smoosh it to store it, this next step is vital-you need to FLUFF, FLUFF, FLUFF! It will never matter how much or how little you pay for your garland base if you skip this step. I cannot emphasize it enough, FLUFF YOUR FAUX PINE NEEDLES!

To fluff your garland, simply take each individual wire pine piece, and manipulate it until it is straight and in a place that makes your garland look like its needles are laying in one direction. This step is very quick and simple, so don’t feel overwhelmed if your garland needs a little more love than other years.

Next you will be adding in your greenery. For indoor use, simply stick your greenery stem against the wire of the garland, and wrap a piece around the stem to secure in place. For outdoor use, simply hot glue your greenery to the core of the garland (this requres a little more commitment, but worth the outcome). I always aim to use at least 3 different elements in my garlands, and to place the elements in a disorganized pattern. Some will be higher, some lower, some closer together. This will imitate the natual disorder of natural garlands, and give a peace of mind when nothing turns out perfectly symmetrical.

Once your greenery is attached, you will want to “snuggle” your piece into the garland to give a more natural “I’m supposed to be here” look. Don’t worry if its not perfect, the more you wiggle and play the more it will fit right into your garland!

Once your greenery base is complete, feel free to play around with elements you love! Ornaments, berries, pinecones, ribbon-you name it! The whole purpose is to make this garland a one of a kind decoration, tailors specifically to you and your style! Have fun with it, and don’t be afraid to start somewhere! You can always see videos on my Instagram highlight, under Christmas 🙂

Talk soon,

xx, Lanna


Building a Murphy Bed (pt. I)

Our disaster second bedroom

Our second bedroom is a nightmare! Ever since move in day, this back bedroom has become a homeless shelter for all the junk that doesn’t have a “spot”, or where all the “I’ll deal with it later” items go to die zone. And in 750 sq ft, we are not really allowed the luxury of having valuable space go to waste.

The end goal for this room was a functional office/workspace, that could easily accomodate for any guests that needed a place to sleep (without having to clear a floor space for an air mattress, because honestly, who like sleeping on those anyways?)

Cue Mr. Murphy bed.

We actually came up with the idea of putting in a Murphy bed back when we were renovating this house, but between construction of making the house “livable” and moving in, there wasn’t much time to make this idea come to life-until now! The plan was to make a queen sized bed with shelving on both sides, and to finish it out with crown molding to give a “built-in effect”. So we recruited my magic woodworking step-dad Todd (who graciously volunteered his Thanksgiving break) to help with some of the logistics, and got to work using plans purchased from DIY Tyler (https://www.diytyler.com/shop/cheap-hardware-murphy-bed-queen/).

Materials used (bed):

My super hero guys cutting our plywood down to provided measurments.

5) Sheets of 3/4″ Plywood for the bed.

1) 2x6x8

2) $10 Swivel Brackets

Various screws, nuts and bolts.

. . .

DAY 1:

We spent day one cutting out all of our wood pieces down to size using a table saw, and applied edge banding to any exposed edges.

During this step, its really important to use a hot iron, and really press the edge banding on the plywood to reduce any seperation and give that clean finish (we had some issues with this step, so when I say use a hot iron, use a HOT iron). Clean up your edges with an edge band trimmer, and sand down any rough places to give a smooth, seamless finish. I honestly LOVED the effect that using edge banding has, this simple (and relatively cheap) addition was a great alternative to using solid, expensive sheets of wood.

Next, using a Kreg jig (hahah moment, didn’t realize it wasn’t spelled CRAIG…who knew…) to drill pocket holes into our pre-cut pieces to make the frame. I’ve linked a big boy Kreg jig set, but you could also use a more basic Kreg jig, it just may take a little longer to get the job done. After you have your holes drilled, use Kreg screws and wood glue to attach the pieces together as instructed. The set of plans we purchased were very useful, however, I will admit I was glad Todd was experienced in reading them. Having a set of expeirienced eyes really made the process much smoother when it came to deciphering the plan drawings.

As day one drew to a close (sunset is around 4pm, thanks winter) we had an assembled frame! YAY! We sanded this baby down, and since we were at my parents house using the big boy tools, we loaded the frame up and brought it home with us until install day…to be covered soon! My husband did have to spend an extra afternoon with Todd cutting out the shelving pieces, as we had to wait and remeasure to make sure it would all fit, but we got mostly all the cuts, banding, and frame assembly done in about 4 hours, which is a win in my book!

That’s all for now, talk soon!

xx, Lanna


HELLO

Hello, friends! My name is Lanna and I have 0 clue what I am doing. I’ve had the idea to create this blog for several months now, but really decided to give this thing a go late last night…because the best ideas happen when your depraved of sleep, right?

I am married to my best friend, Harley. We have been married since December 15, 2018-but have been together since 2012! We met at our hometown church, and have been inseperable since. Because we have done a lot of growing up together, he is pretty used to all my crazy ideas and jumps in with me whole-heartedly!

This brings me to our most recent crazy endeavor, and the brain child of this blog: The Farm. Yes, we bought a (non-functioning) 5-acre farm in the middle of DFW at the beginning of March 2020, and it has probobly been one of the most trying, and rewarding decisions we have made so far. Wait, March 2020? Isn’t that right when COVID-19 decided to stick its ugly hand into every aspect of our lives? YEP. But let me tell you, this place is going to be so worth it.

It has been such a crazy ride, and I have decided to share some our experiences, failures, goals, and dreams right here- with you! Since buying the property we have gutted, and converted, a 750 sq ft “shack” (I’m serious) into a functional living space! And in September we packed up our 3 dogs (and cat) all their things, and shoved our lives into this quaint apartment-sized home. We are currently working on plans to build our forever home, and are hoping to begin building in the early months of 2021!

I cannot wait to share more of our lives with you all! Stay tuned!

XX,

Lanna